Monday, November 26, 2012

Sureau Sew-along: Adding a Collar


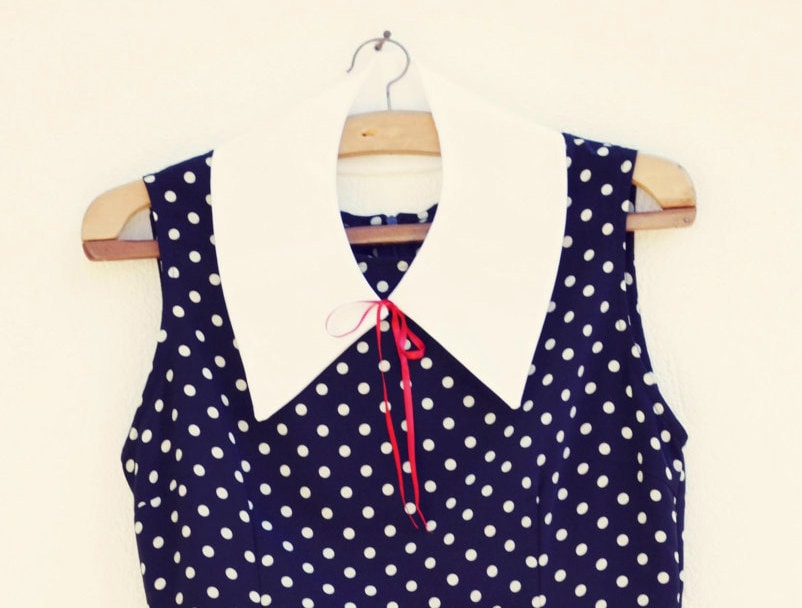
example of pointy collar
Last week of the sew-along! In these last few posts, we're going to see a few ways to alter the Sureau, and we're starting with a collar!
I'm going to show you how to draft a pointy (or Chelsea) collar for your dress.

Start by tracing the seam allowance on both the shoulders and neckline of your bodice pieces.

Now pin or tape your pieces together at the shoulder, overlapping the seam allowances plus an extra cm at the armhole. This will make your collar lay better.

Now lay some tracing paper over your pattern pieces and trace the neckline, the seam allowance, the begininning of the center back and front. Mark where the shoulder seam is (you don't need a long line like I did, a little notch is more than enough).


With a ruler, mark some dots at 6 cm (or your preferred width) and join them with the help of a French curve.

Decide at what angle you want the point of your collar to be. I marked 3 cm from the center front and drew a straight line.

Trace the seam allowance all around your collar (although not at the center back) and cut.
And you're done!

To construct the collar:
Cut two collar pieces on the fold of the fabric and sew along the outer edge, with right sides together.
Remember that notching the curve and pressing the collar carefully once you've turned it will make a HUGE difference on your finished result.
When you pin the collar on the neckline, the two parts will have to overlap at the center front and meet at exactly 1,5cm from the edge.
Once the collar is stitched on, you will pin and the sew the facing over it and proceed as usual.

If you want to see how to draft a peter-pan half collar, here is Eléonore's post.

Friday, November 23, 2012

Sureau Sew-along: Attaching the Sleeves


Let's start by seeing what you need to do after installing the zipper and before attaching the sleeves:

✄ Stitch front and back facing together at shoulder seam;
✄ Finish the outer edge of the facing;
✄ Stitch front and back bodice at shoulder seam;
✄ Pin facing to neckline and stitch; notch the seam allowance and topstitch;
✄ Baste facing to the armhole;
✄ Sew the long seam of your sleeves and finish the seam allowance.

If you need help with any of these steps, leave a comment below.
All set? Now we can attach our sleeves.

Start by stitching two rows of gathering between the marks on the sleeve caps (the marks, not the notches). I used tailor tacks for my marks, so I'm sorry they're not very visible in this photo, but they're there.

Now pin the sleeve to the armhole. I always start with these main points:
✄ matching the sleeve seam with the side seam of the dress;
✄ matching the notches;
✄ matching the sleeve center mark with the shoulder seam;
✄ finally, inserting a pin at the beginning and at the end of the gathering threads, where the mark are.

Now just start pulling the gathering threads as much as you need to and pin the gathers down.
You'll notice that there are more gathers towards the back, and that is normal (the back of you shoulder need more ease for movement).

If you're a beginner, I would highly recommend that you baste your sleeve at this point. Sleeves are quite tricky to sew, and you really don't want to rip your seam and having to do it again, trust me. 

To the sewing machine, stitch the sleeve, easing the gathers carefully under the presser foot. I would recommend starting to sew at the side seam, not at the gathers.

Turn the sleeve to the right side, and if everything looks fine, remove your gathering threads, finish the seam allowance and you're ready to hem your sleeves and the skirt.
Oh, and pat yourself on the back, because we're almost done!
Remember to pass by the Flickr group to show everyone your progress!

Wednesday, November 21, 2012

Sureau Sew-along: Installing the Zipper


A little change of plans: today we were supposed to cover the sleeve insertion, but I decided to go with the zipper first.
I actually find that if you're using the method I'm about to illustrate, it's easier to install the zipper before you even sew the shoulder and side seams, because the dress is much easier to manipulate at this stage (you don't want to accidentally catch a sleeve under the presser foot, do you?).

So, what you need to do before installing the zipper?
 Stitch the darts
 Gather the front bodice and stitch the button placket
 Gather the skirt panels and stitch them to the front and back bodice
 Finish your seam allowances on the right side of the dress separately

[This is very stupid, but it ALWAYS confuses me (I hope I'm not the only one): the zipper goes on the left side of the garment when you wear it, so during construction, when you have the garment in front of you, the zipper will be on the right side.]

If you're done with everything, let's proceed.

On the left of the zipper mark: regular stitch length. On the right: basting stitch
The process is basically the same as we've seen when we sewed our muslin.
This time though, you will need to stitch your right side seam:
✄ use a regular stitch length from the top of the side seam to the zipper mark.
 Backstitch, then set your machine to a basting stitch (4-5mm) and stitch all the way down to the zipper end mark.
 Set your machine back to the regular lenght, backstitch, and sew all the way down to the hem.

Press your seam open with the help of a seam roll.

On the wrong side of the garment, lay the zipper right side down on the basted portion and pin it.

Still on the wrong side of the dress, baste the zipper and remove the pins.
I know hand basting is boring, but it will take you 5 minutes tops and it will ensure you won't f*** up your zipper installment, which you'll appreciate, especially if you're a beginner.

I'm using a photo of the muslin construction because my black and white fabric was very difficult to photograph... Sorry!
Flip the garment on the right side and stitch the zipper using a zipper foot. You can use your hands to feel where the zipper teeth are and stay close to them.
When you reach the bottom of the zipper, pivot, sew over the zipper (but be careful not to sew over the metal part, you'll break your needle!!!) and stitch the other side of the zipper.
Now you just need to remove the basting with the help of a seam ripper to reveal your beautiful zipper!

Of course, if you prefer, you can use an invisible zipper, or, if you know a method that you like better, feel free to use it (and share it, please, I'm curious)!
This one is probably my favorite method and the one I would recommend to a beginner.

Monday, November 19, 2012

Sureau Sew-along: A Few Tips on Gathering


We're finally in my favorite part of the sew-along: the construction! If you're curious to see how my pattern adjustments went, I uploaded a photo on Flickr which I hope might be useful to someone.
I also edited the post on fixing the shoulder line adding the link to a great tutorial I used to eliminate a gaping neckline, so if you still have that problem, go check it out.

We're starting with what is literally the central element of this dress, the gathers. They're very quick and easy to sew, they just need a little attention.

First of all, you will need to set your machine to a higher stitch length than usual. I usually set it between 3 and 5mm. The stiffer the fabric, the longer stitch you'll need to use, and viceversa (shorter stitches give more even gathers).
If your fabric is more on the bulky side, you might also want to lower the thread tension.

Now stitch two parallel lines between the marks, close to the edge of the fabric, leaving long thread tails at the beginning and at the end. If your fabric is particularly unruly, you may stitch a third row for more stability.

While holding the thread tails on one side, pull them gently on the other and you'll see the fabric starting to gather. When the gathered part is equal in length to the piece you need to stitch it to (in our case, the button placket), either knot the thread tails or wrap them around a pin.


Distribute your gathers as evenly as possible, then pin your pieces together.
Stitch them with the gathered side facing up, easing the fabric under the foot with both your hands. This should help avoiding any accident and give you beautiful gathers.

A great tip from Eléonore is to sew your bust gathers always in the same direction (meaning either going down or up for both pieces) to get a mirror effect which will look more professional.

A little bonus on the button placket: if you want a cleaner finish on the inside, cut a second button placket, stitch it on the wrong side of the garment on one side. Press the seam allowance on the other side and secure it using a few hand stitches. This way, you will cover the seam allowances of the center bodice!
I'm sorry I didn't take a picture of this process, I'll try and upload it on Flickr in the weekend!

Sunday, November 18, 2012

Burdastyle Magazine 12/2012

I thought it was nice to take a break from the sew-along and see what's going on with the latest issue of Burda.
After my last post, I made the resolution to be less negative and try to see the positive aspects of this magazine.

So, let's start with what I liked:
 I love everything about this dress: the contrast detailing, the silhouette, the little pleats... quite a unique pattern, I don't think you can find something too similar in past issues.
VERY WELL DONE, Burda guys!

These coat and jacket are awesome. Again, very unique designs, very detailed, modern looking and flattering. I'd gladly steal the first one off the model and wear it all winter (although I'm not too sure how practical the hook closures can be).
I also appreciate the styling of this shoot, modern but not "staged-fashion-victim", as they did a few times in the past.


This is a very simple skirt, but I very much like the idea behind it. It's the perfect project for a beginner who wants to create something with a little more "umph" without using a complicated pattern (and on trend, with the color blocking).
The fabric choices in this issue, for once, are adorable.

Then,there are some so-so patterns...
I really, really want to like this dress, but the more I look how it fits the model, the dowdier it looks to me. I don't know, maybe as a blouse, with narrow sleeves?

Again, I want to like this dress (it's the vintage pattern of the month), but all that added volume on the belly could be a problem for many people. I'd definitely make in a lighter fabric, if I were to attempt it.

And finally, two WTF moments, because these reviews are not complete without at least a couple of them.

The vest pattern is available on its own and it's quite flattering (if vests are your cup of tea), but these ginormous sleeves are just ridiculous. They're not even costum-y, they're just plain weird.

Again, ridiculous sleeves. You might like this jacket and it's fine, but I just find it horrendous, very 90's and not in a good sense. The shiny baby blue satin doesn't help at all...

Friday, November 16, 2012

Sureau Sew-along: Lengthening/shortening the bodice


If you find that you're bodice hits you lower or higher than your natural waist (the most narrow point of your torso), measure how much length you need to subtract or add and let's proceed.
Remember to take this measurement with a muslin that has a thread-marked seam allowance, or better yet, with the skirt attached, so that you're seeing the length of the finished bodice.
1. On the front bodice, draw a line perpendicular to the grainline that cuts the side seam approximately in half. 

2. Cut along the line.

3. According to the alteration you need, either lay one piece over the other, or distance them. The most important thing is to keep the grainline on a straight line.
If you're making your piece longer, put some paper under it and use some tape to hold everything in place.

Re-draw the dart, the side seams and the grainline, and you're done!
Now you just need to repeat the same steps for the back bodice and add the same amount to the button placket.

And we're finished with the alterations! If you need help fitting your muslin, don't hesitate to post your pictures on our Flickr group.
I'll see you next week, when we start to sew up our dress! :)

Thursday, November 15, 2012

Sureau Sew-along: Reducing the back bodice

Today we see how to alter your back bodice if it fits you at the neckline and at the waist, but it's too large in the middle.

Start by pinching off the excess fabric on your muslin, measure it and divide it by two. Now you know how much you need to reduce the pattern.

1. Trace a line going from the base of the dart to its point, and extend it all the way up to the shoulder.

2. Cut along the line, leaving a little space to pivot.

3. Now simply lay one part over the other, according to the measurement you got at the beginning. Use some tape to hold the pieces together.

4. Re-trace the dart: mark a spot where the old point was, that falls in the middle of the old dart legs and connect it to them.

And you're done!
If you find that most of the excess fabric is in the lower part of the back, you might prefer to do a sway back adjustment. Portia has a great tutorial on it, so I'm not going to illustrate it.