Showing posts with label completed projects. Show all posts

Tuesday, March 22, 2016

Sewing Around the World - Schnittchen Katja shirt


Pattern: Katja shirt by Schnittchen
Size: 38
Alterations: none
Fabric: striped jersey viscose + lace trim c/o Supercut

Today I'm happy to present my project for Sewing Around The World, an idea of German indie pattern company Schnittchen involving 12 sewing blogger from different countries throughout 2016.
I'm following Silvia from Germany who sewed the Joanna coat and Julie from France, with the Lola cardigan.

My own pick was the Katja shirt, a knit kimono top with a relaxed fit, an optional triangular appliqué and two different length options (I used the shorter one). The pattern is available both as a PDF and as a printed pattern, at very affordable prices, and has instructions in either German or English. 

So... Why did I choose this pattern?
To be completely honest, it was the result of compromise. I LOVED the patterns that the two previous bloggers chose, so they were not an option.
The other patterns I liked didn't have English instructions (such as the Nina pants) and I also wanted something easy and quick to sew, because I thought I would be knee deep in moving into my new home in March (which is not the case yet... don't ask).

I'm also always up for trying new silhouettes that are out of my comfort zone (meaning, basically anything that doesn't have a cinched waist).

Am I happy with my Katja shirt?
Uuunnnh... Yes and no.
These are the things I like:
  • The comfort: while I don't think this is particularly flattering on me, I can't deny it's really comfortable and snuggly. After taking these photos in the late afternoon, I didn't take it off until I changed in my PJs.
  • The V: I think it makes the shirt unique and gives you the possibility to use many trims.
    I chose lace, but Supercut also sent me some gold piping that would have looked pretty nice with it.
    At the same time, it's an appliqué, so it will add weight to the shirt and it will make the neckline seam significantly more bulky.
    If you don't like the V, it's optional, so you can forget about it.
  • The milted corners: Katja has little slits on the side seams and they are finished with milted corners, which are easy to sew but give a super nice finish.

This viscose is not the easiest to sew.
I gave up matching stripes on the sides after unpicking a couple times, out of frustration.
Now, for the things I don't like:
  • The pattern: Multiple parts of the pattern do not match, specifically the front and back sides and the shoulder of the appliqué with the main shirt.
    I am getting more and more picky with patterns ever since starting taking patternmaking classes, but things not matching up are really annoying, period, no matter how skillful you are.
    Also, the neckline band is cut on the bias and that's unnecessary, unless you're using a knit with very little stretch.
    EDIT: Silke, creator of Schnittchen patterns, explains:
    "
    Concerning the bias tape: this pattern piece had to be constructed as bias tape because you can sew Katja also with cotton so to say with fabrics without ANY elastic. So we had to construct the neckline band as bias. This is also the reason for the quite wide neckline...Concerning the side seams: the length of the side seams fit perfectly, however we had to construct the curve in the front side seam different to that in the back because we left out the darts in the front pattern piece. So these (the darts or better to say the width of the darts) were "turned" to side seam. We needed to do this because in the front piece you have to have more width because of the busts.."
    (More in the comment section)
  • The fit: this is JUST personal preference, but this shirt has a lot of ease and I just don't like it. It makes me look so much bigger than I am.
    The neckline is too wide (again, for my taste), and the bottom is flared, which I don't think is too flattering on this length.
  • The instructions: the instructions that come with the pattern are VERY essential. You might not care in the least for this, but I do like my instructions to be clear and thorough, especially for beginners patterns. I guess this has to do with the affordable price of the pattern: more pages and illustrations = higher costs.
    Schnittchen does offer a photo tutorial for Katja (which I could only find in German), and that's great, but that means you need a device and an Internet connection while you sew. 
All in all, I enjoy my finished top but I think this pattern could use some improvements. 
If you like a loose fit, and are looking for a comfy top pattern with unique details at a reasonable price, this might be the one for you!

Thanks Schnittchen for including me in this beautiful tour, I'm really grateful :D

*** This post is sponsored by Schnittchen ***


Modellomaglia Katja di Schnittchen
Taglia: 38
Modifiche: nessuna
Tessutojersey di viscosa a righe + nastro in pizzo c/o Supercut

Oggi, sono lieta di presentarvi il mio progetto per Sewing Around The World, un'idea della compagnia indie tedesca di cartamodelli Schnittchen, a cui partecipano, cucendo modelli di questo designer, 12 blogger di cucito da tutto il mondo durante il 2016.
Io seguo Silvia dalla Germania che ha cucito il meraviglioso cappotto Joanna e Julie dalla Francia, con il cardigan Lola.

La mia scelta è ricaduta sul top Katja, una maglietta a kimono con vestibilità molto rilassata, un'applique triangolare opzionale e due diverse opzioni di lunghezza (io ho tagliato la più corta). 
Il modello è disponibile sia come PDF che in versione stampata, a un prezzo piuttosto conveniente, e le istruzioni sono disponibili in tedesco o inglese. 

Ma quindi... Perchè ho scelto questo modello?
Ad essere completamente sincera, è stato il risultato di un compromesso. Mi piacevano moltissimo i due modelli usati dalle ragazze prima di me (ma non potevo fare una ripetizione); gli altri modelli di mio gusto non avevano le istruzioni in inglese (tipo i pantaloni Nina) e inoltre volevo qualcosa di rapido da cucire, perchè al momento della scelta pensavo che a marzo sarei stata fino al collo in mezzo al trasloco (cosa che per vari motivi non è ancora successa, stendiamo un pietoso velo). 

Infine, accetto sempre di buon grado nuove "sfide" per quanto riguarda le silhouette da indossare (nel mio caso, qualsiasi cosa non sia stretto in vita).

Mi piace il mio top Katja?
Eeeeeeehhh... Sì e no.
Queste sono le cose che mi piacciono: 
  • La comodità: anche se trovo che questo top non mi valorizzi particolarmente, non posso negare che è estremamente comodo e coccoloso. Dopo aver scattato queste foto nel tardo pomeriggio, non me lo sono tolto finché non sono andata a dormire, e l'ho scambiato col pigiama.
  • La V: Trovo che renda il top unico e che ti dia la possibilità di usare un sacco di passamanerie. Io ho optato per il pizzo, ma Supercut mi aveva anche mandato del profilo dorato che sarebbe stato carinissimo.
    Allo stesso tempo, ricordate che la V è un applique, e quindi aggiungerà peso al top e renderà la cucitura dello scollo più spessa.
    Però, se a voi non piace, è assolutamente facoltativa.
  • Gli angoli squadrati (tipo tovaglia): Katja ha degli spacchetti nelle cuciture dei fianchi rifinite con angoli quadrati (per intenderci, quelli con la diagonale). Sono semplici da cucire e danno veramente una bella finitura. 
Questa viscosa non è semplicissima da cucire.
Dopo aver scucito i fianchi un paio di volte, mi sono rassegnata al fatto che le mie righe non avrebbero corrisposto
(troppa frustrazione per fare altrimenti!)
E ora, le cose che non mi piacciono:
  • Il modello: ho trovato più pezzi del modello che non combaciavano; i peggiori erano il fianco davanti e dietro, ma anche l'applique non combacia sulla spalla del pezzo davanti.
    Mi rendo conto che da quando studio modellistica sono più esigente, ma si tratta di controlli basilare che una modellista dovrebbe fare sempre, e mi dà veramente fastidio trovare questo genere di errore in un modello commerciale.
    Inoltre, la striscia per lo scollo viene fatta tagliare in sbieco, cosa completamente inutile a meno che il vostro tessuto sia veramente poco stretch.
  • La vestibilità: si tratta di gusto personale, ma questo top ha veramente tantissima vestibilità. Avrei tranquillamente potuto tagliare due taglie in meno e avere una maglia comunque comoda. Così larga proprio non mi piace, specialmente con questa svasatura piuttosto pronunciata sul fondo.
    Sempre a proposito di gusto personale, non mi piace lo scollo, troppo largo per essere così alto.
  • Le istruzioni: le istruzioni incluse nel modello sono MOLTO stringate. Magari a voi non importa e preferite cucire senza nemmeno guardarle, ma a me piace che le istruzioni siano complete e dettagliate, specialmente se si tratta di un progetto per principianti (che hanno bisogno di essere guidati).
    Immagino però che la questione sia legata al prezzo piuttosto basso del modello: più pagine e illustrazioni o foto = costo più elevato.
    Schnittchen offre comunque un fototutorial per Katja (che però ho trovato solo in tedesco), ed è fatto molto bene, ma ciò significa che voi dobbiate avere a disposizione un dispositivo e una connessione internet mentre cucite. 
Tutto sommato il risultato non mi dispiace (lo indosserò in situazioni di comfort), ma credo che il modello avrebbe bisogno di una messa a punto.
Se a voi piacciono i top loose e volete un modello per una maglia comoda e con dettagli particolari a un prezzo contenuto, magari Katja fa per voi!

Grazie ancora a Schnittchen per avermi incluso in questo tour del mondo!

*** Questo post è sponsorizzato da Schnittchen ***

Sunday, October 26, 2014

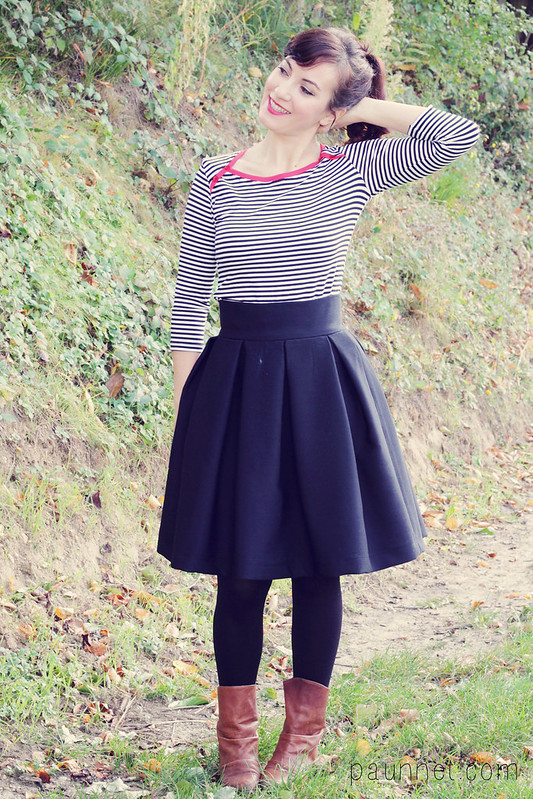
2 Bronte Tops for Perfect Pattern Parcel #

Size: 10
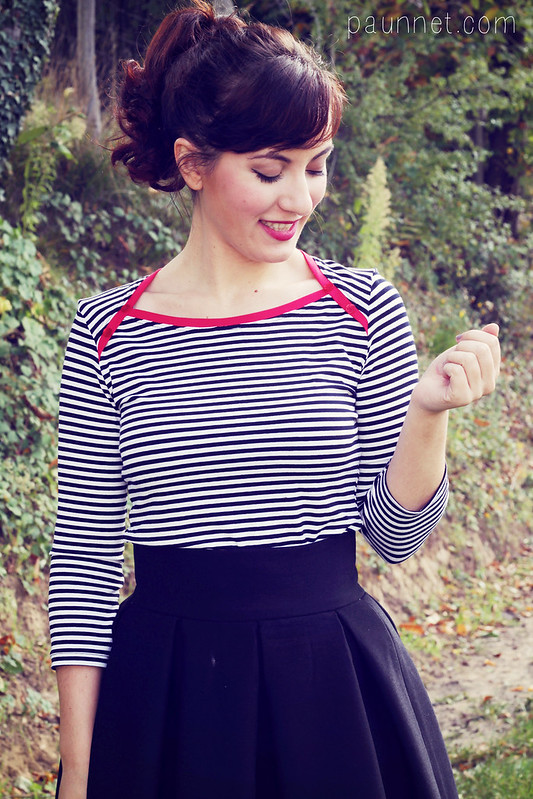
Alterations: for the striped top, I shortened the long sleeves into elbow length
Fabric: both knits were from my stash, the striped one is the same I used for my Mariposa tee


So I've been asked again (see my first time here) to participate to the Perfect Pattern Parcel tour, and of course I said yes!
Not only do I get to try out some new indie patterns, I get to do it for charity as well.

Skirt: Zara (old)
Boots: OVS (old)

I must say pretty much all the patterns included in the pack are really awesome (see list below), but I was conquered by the Bronte top. Jennifer actually asked me to be a tester when the pattern came out, but I was having a really busy period, so I sadly declined.
But now that this gorgeous knit pattern has magically returned into my life, I just had to make it.

Skirt: handmade
Boots: Les Lolitas (very old)
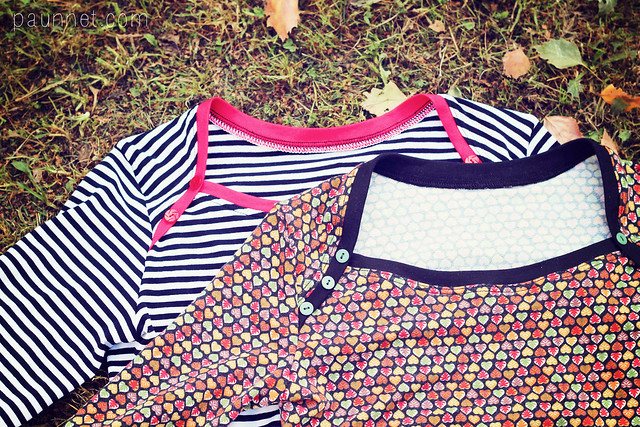
I liked the first version so much that I immediately made a second one!
I love them both equally (although knowing myself, I'll probably wear the striped one more), and in these photos you can really see how versatile this pattern is, working really well in two very different outfits.

Jennifer did a great job on this pattern on all levels.
I love the fit, which is very snug; if your stomach is an area you want to conceal, you will definitely need some alterations, but for me, liking my knits to be very snug and form fitting, this is absolutely perfect.
The instructions are very well written and illustrated. There are also some tips on how to choose and how to sew knits, which never hurts.

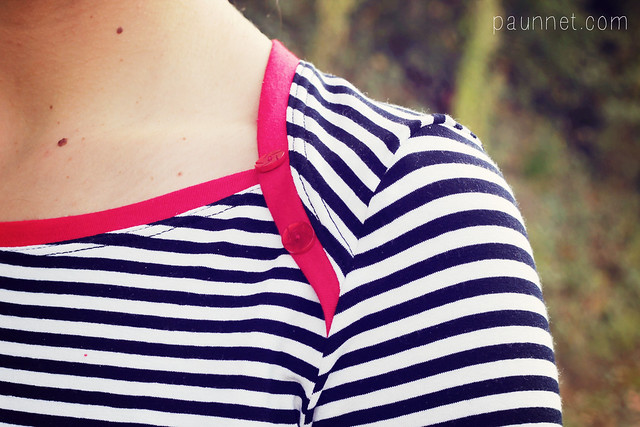
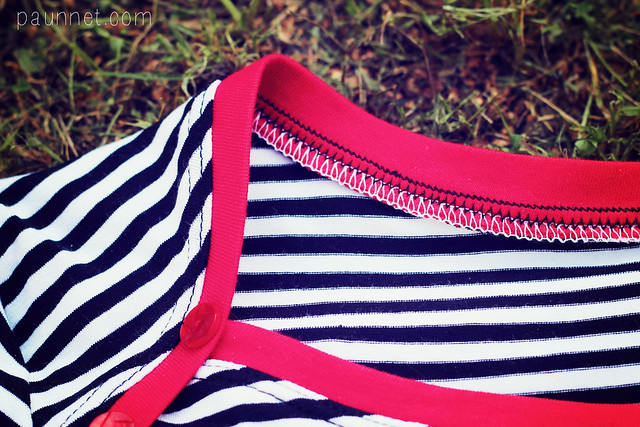
Here you can see a few constructions details: the black thread on top is the lighting stitch used to sew the band to the neckline; the white thread is the serger seam I used to finish the edge (too lazy to re-thread my serger with black...), and in the middle, you can see the wrong side of the double needle stitches.

This is how hemmed both the bottom and sleeves.
The pattern instructions say to fold the fabric twice and topstitch, but in order to avoid bulk, I turned the fabric once, machine basted, then used the double needle on the right side, and then trimmed the excess close to the seam.
If you finish the bottom edge with a serger before doing the rest, the result will look even nicer; I didn't bother (again, too lazy) and it looks ok anyway.

I also tried the Hudson pants included in the Parcel and I was enthusiastic about them, but having used a really fugly fabric, I didn't even bother taking photos... But they do have my stamp of approval too!
I also want to eventually try the Zsalya Dress by Kate and Rose: such a beautiful design!

I'll leave you to the details of the Parcel, as well as to a link for purchasing it... Think about it, it's a great chance for you and to do something good :D 

Pattern Parcel #6: Choose your own price and support DonorsChoose. Win/win


How Pattern Parcel Works:
Here at Perfect Pattern Parcel, we believe in supporting independent pattern designers. It’s our opinion that indie patterns are just, well, better than big box patterns, and we’re pretty sure our customers think so too. So, we allow customers to show their support in naming their own price for each Parcel.
We also encourage customers to allocate part of their Parcel price to the charity Donorschoose.org in order to help classrooms in need. Pattern Parcel donates all profits after expenses from Parcel sales to the charity as well. Together we've raised over $12,000 for classrooms in need!

Parcel #6 includes: 

Bonus Pattern:
Choose a price of $32 or greater for Parcel #6 and you will automatically also be sent the Bonus Pattern! That's only $5 a pattern. The Bonus Pattern for this Parcel is the Odette Dress by Bluegingerdoll. Vintage inspired silhouette is had two flattering necklines and a gorgeous skirt.  The Odette Dress pattern goes from a size 4 through a 24!

Pattern Parcel #6: Choose your own price and support DonorsChoose. Win/win


Taglia: 10
Modifiche: per la versione a righe, ho accorciato le maniche ai gomiti
Tessuto: entrambi i tessuti erano nella mia collezione da un bel po', quello a righe era un avanzo della Mariposa tee fatta tempo fa


Mi è stato chiesto nuovamente (la mia prima volta qui) di partecipare al tour per il Perfect Pattern Parcel, e ovviamente ho detto di sì!
Non solo ho la chance di provare nuovi modelli indie (sì, sono drogata), ma lo posso pure fare per beneficenza!
Gonna: Zara (vecchia)

Stivali: OVS (vecchi)
Devo dire che quasi tutti i modelli inclusi nel pacchetto sono fantastici (trovate la lista qui sotto), ma sono stata conquistata dal Bronte top. In realtà, Jennifer mi aveva chiesto se volevo fare da tester quando è uscito il modello, ma avevo tristemente dovuto rifiutare a causa di un perdiodo un po' troppo impegnato. 
Ma ora che questo bellissimo modello è tornato come per magia nella mia vita, dovevo assolutamente farlo!

Gonna: Fatta da me

Stivali: Les Lolitas (molto vecchi)
E il primo mi è piaciuto così tanto che ne ho fatto subito un altro! 
Li amo entrambi in maniera uguale (anche se, conoscendomi, porterò di più quello a righe), e in queste foto potete vedere com'è versatile questo modello, perfettamente adatto a due outfit molto diversi. 

Jennifer ha fatto un lavoro sopraffino con questo modello. 
Innanzitutto amo la vestibilità, molto molto vicina al corpo. Se non vi piace mettere in evidenza la pancia avrete sicuramente delle modifiche da fare, ma per me, a cui piacciono le maglie belle strette, è semplicemente perfetta.

Le istruzioni, poi, sono molto ben scritte e illustrate. Ci sono anche molti consigli su come scegliere e cucire i tessuti elasticizzati, cosa essenziale per una principiante e che non fa mai male ripetere a chi è più esperta.


Qui potete vedere qualche dettaglio di costruzione: il filo nero in alto è il punto elasticizzato con cui ho cucito la banda alla scollatura; il filo bianco è quello della tagliacuci (sono stata troppo pigra per reinfilarla di nero...) con cui ho rifinito il bordo, e infine, il filo nero nel centro è il rovescio della cucitura con l'ago doppio. 

Questo è il metodo che ho usato per l'orlo in fondo e delle maniche.
Le istruzioni dicono di piegare il bordo due volte e ribattere, ma per evitare troppo spessore io ho piegato una volta sola, ho imbastito a macchina e, dal diritto, ho cucito con l'ago doppio. Ho poi tagliato l'eccesso di stoffa ben vicino alla cucitura.
Se rifinite il bordo con la tagliacuci prima di imbastire, il risultato sarà ancora più carino (d nuovo, io sono stata troppo pigra), ma a me piace anche così. 

Del pacchetto, ho anche provato i pantaloni Hudson e ne sono rimasta entusiasta, ma li ho fatti in un tessuto veramente osceno, perciò mi sono risparmiata le foto... Tuttavia, li consiglio caldamente!
Prima o poi voglio anche provare l'abito Zsalya Dress di Kate and Rose: un design bellissimo!


Ora vi lascio ai dettagli del Parcel, e a un link per l'acquisto... Fateci un pensierino, è una bella occasione per voi stesso e per fare un bel gesto contemporaneamente! :D

Pattern Parcel #6: Choose your own price and support DonorsChoose. Win/win
Come Funziona Pattern Parcel:
Noi di Perfect Pattern Parcel, crediamo nel sostenere i designer di modelli indipendenti. Crediamo che i modelli indie siano migliori di quelli dei grandi marchi e siamo piuttosto sicuri che anche i nostri clienti lo pensino. Perciò, facciamo in modo che i nostri clienti mostrino il loro supporto decidendo il proprio prezzo per ogni Parcel.

Incoraggiamo anche i clienti ad destinare parte del prezzo del loro Parcel all'organizzazione Donorschoose.org per aiutare delle classi in necessità. Pattern Parcel dona tutti i proventi, spese escluse, a questa organizzazione. Insieme abbiamo raccolto più di 12mila dollari per classi in difficoltà!

Il Parcel #6 include: 
MODELLO BONUS: Abito Odette di Bluegingerdoll

Modello Bonus:

Scegliete un prezzo di $32 o più per il Parcel #6 e vi verrà mandato automaticamente il modello bonus! Per questo Parcel, si tratta dell'abito Odette di Bluegingerdoll. Con una silhouette di ispirazione vintage, ha due varianti di scollatura e una bellissima gonna. Va dalle taglie 4 a 24!


Pattern Parcel #6: Choose your own price and support DonorsChoose. Win/win

Friday, October 10, 2014

Chambray Bruyère shirt


Size: 40 bust and waist, 42 hips
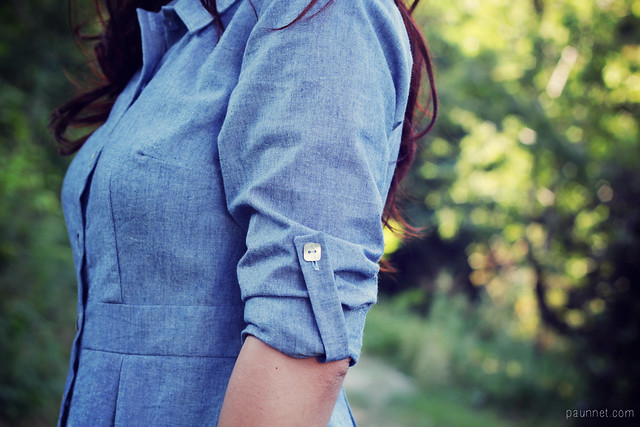
Alterations: I added sleeve tabs
Fabric: Locally purchased blue chambray

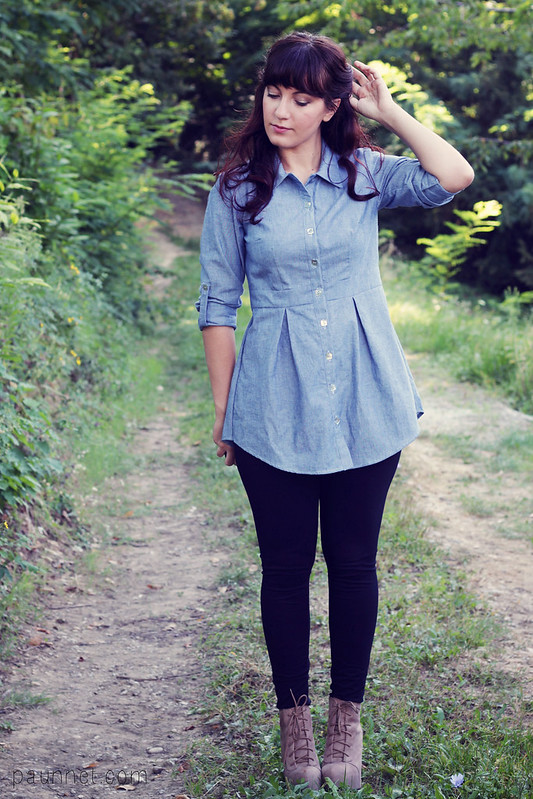
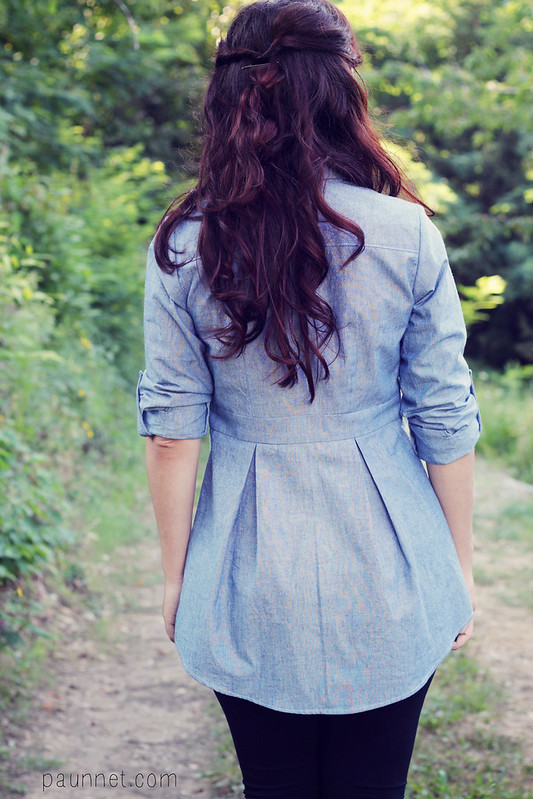
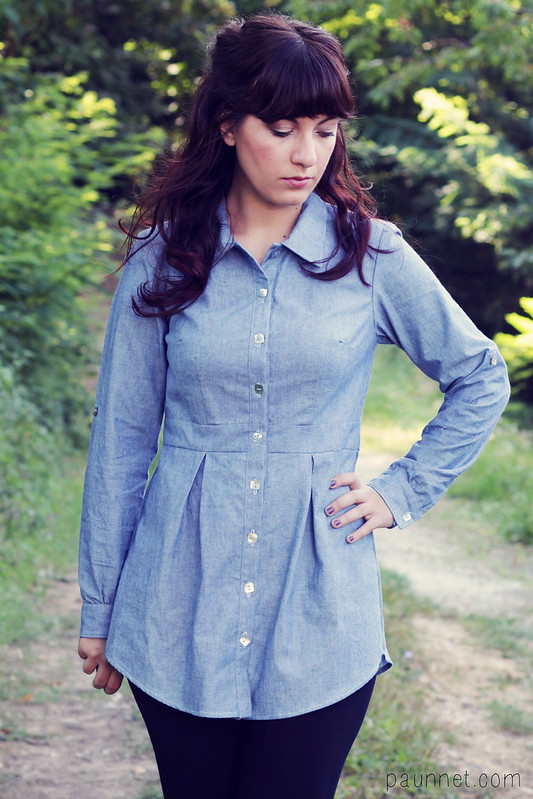
Last Summer, I have once again had the delightful chance to be a tester for Deer and Doe and to try their latest offering, the Bruyère shirt. It is a tunic-lenght shirt with a cinched waist and beautiful box pleats both on the front and on the back.

Although I love button-up shirts (and shirt collars and shirt dresses) and I wear them almost daily, I was initially a little perplexed by the length of Bruyère.
I know tunics are overall very popular (for some reason, I have the impression they are especially popular in France), but not in my wardrobe, because I tend to wear pants as rarely as I can, and when I do, it's NEVER skinny jeans or leggings. As you can see in these photos, I am rather evidently pear-shaped and I also have a big booty; I'm not extremely self-conscious of that, but I prefer not to display this area of my body too much (that's why I like dresses with a cinched waist and a full-ish skirt that hit above the knees).

For the sake of these photos, I decided to try something new and wear my Bruyère with leggings, but it's not something I'm likely to repeat soon. I mean, it is a really comfy outfit, it's just not me.

But luckily, Bruyère has proved to be pretty awesome with regular straight-leg jeans as well (maybe it just makes a bit less modern and youthful of an outfit this way), and I've been wearing it plenty this way. It really has been a great transitional garment for these first few weeks of Autumn, when it's very cold in the morning, then it gets warm in the central part of the day, and then it's cold again after sundown.

As per usual with Deer and Doe, I didn't need any fit adjustment (woohoo!). I added buttoned sleeve tabs (which I copied from Pauline Alice's Carme blouse pattern) because I always have my sleeves rolled up, but I found them redundant. Especially if you use a fabric with a bit of body like my chambray here, they stay up by themselves.

I found the construction of Bruyère particularly satisfying: it's not difficult (although I wouldn't recommend it to an absolute beginner), but it requires some precision and patience, which are a welcome challenge for someone a little more experienced. And if you like pretty insides, you can French seam the whole thing like I did and forget about serging or ugly zig zag stitch.

Of course, me being me, I could not resist the temptation to hack the pattern and make into a shirt dress, so that's the next finished thing you'll see around here (hopefully soon!).


Taglia: 40 per petto e vita + 42 per i fianchi
Modifiche: Ho aggiunto dei laccetti con bottone alle maniche per arrotolarle.

Tessuto: Chambray acquistato in un negozio locale.


Quest'estate, ho ancora una volta avuto la fortuna di fare da tester per Deer and Doe e di provare la loro ultima fatica, la camicia Bruyère. Si tratta di una camicia a lunghezza tunica, stretta in vita e con delle bellissime pieghe sia davanti che dietro.

Anche se amo le camicie (e i colletti da uomo, e gli abiti-camicia) e le porto quasi tutti i giorni, ero inizialmente un po' perplessa dalla lunghezza di Bruyère.
So che le tuniche in generale sono abbastanza apprezzate (specialmente in Francia, vero? O è solo una mia impressione?), ma non da me, poichè tendo ad indossare i pantaloni meno possibile, e quando lo faccio non si tratta MAI di skinny jeans o leggings. Come potete vedere anche in queste foto, sono fatta "a pera" in maniera abbastanza evidente, e inoltre ho un sedere importante; anche se ormai ho fatto pace con la mia predisposizione fisica, preferisco non mettere troppo in evidenza quest'area (ed è anche per questo che amo gli abiti con la vita stretta e la gonna ampia).

Per queste foto, ho deciso di provare qualcosa di nuovo e di mettere la mia Bruyère con dei leggings, ma non credo che lo rifarò presto. Certo, ero comodissima, ma a disagio e non mi sentivo "me".

Ma per mia fortuna, Bruyère si è dimostrata fantastica anche indossata con dei jeans a gamba dritta (forse in questo modo è solo un po' meno moderna e giovanile), e l'ho indossata parecchio con quest'abbinamento. E' davvero perfetta per la mezza stagione, in quelle giornate in cui la mattina fa freddo, poi inizia a fare caldo, e verso sera fa di nuovo freddo.

Come al solito con Deer and Doe, non ho dovuto fare alcuna modifica al modello (evvai!). Ho aggiunto dei laccetti abbottonati per tenere le maniche arrotolate, ma devo dire che sono ridondanti; specialmente con un tessuto con un po' di sostanza come questo chambray, le maniche arrotolate stanno su da sole.

Cucire Bruyère è stato particolarmente divertente e soddisfacente. Non si tratta di un processo difficile (anche se lo sconsiglierei a una principiante assoluta), ma richiede un po' di pazienza e di precisione, una sfida ben accetta da chi ha un po' di esperienza. E se vi piacciono le rifiniture pulite, potete usare cuciture all'inglese praticamente ovunque come ho fatto io, e dimenticarvi della taglia cuci o dell'orrido zig zag.

Ovviamente non ho saputo resistere alla tentazione di provare a trasformare questo modello in un abito camicia, perciò sarà il prossimo progetto finito che vedrete da queste parti (spero presto!).

Invece, se volete vedere i modelli Deer and Doe in azione, e acquistarli di persona, ottime notizie: troverete sia Eléonore (la creatrice di Deer and Doe) che me a Vicenza, ad Abilmente, dal 16 al 19 ottobre. Saremo nel padiglione 7, nell'atelier Moda fai da te insieme ad altre designer di cartamodelli e blogger (tra cui Silvia di Sewing Princess).
Veniteci a trovare! :D

Saturday, May 10, 2014

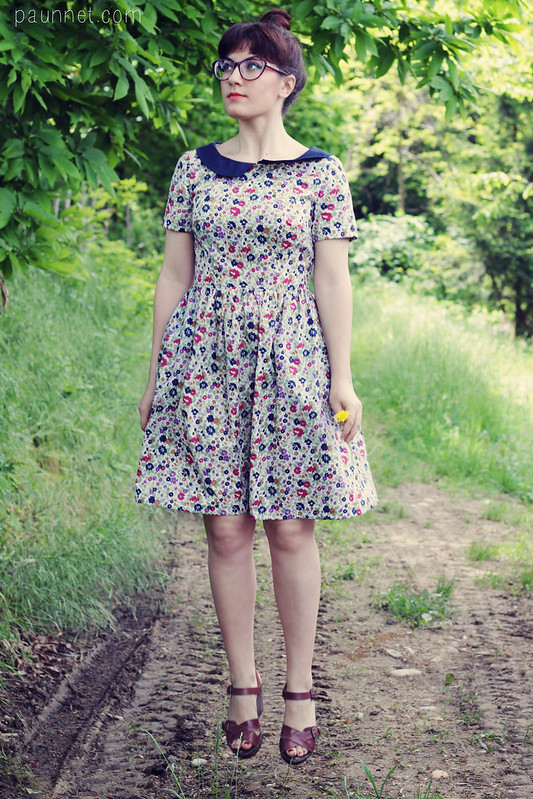
Minerva Blogger Network: a floral Emery dress


Pattern: Emery dress by Christine Haynes (purchased via Urban Cut).
Size: 6
Alterations: I made a 1,5cm FBA following this brilliant tutorial; lengthened the sleeves by about 4cm.
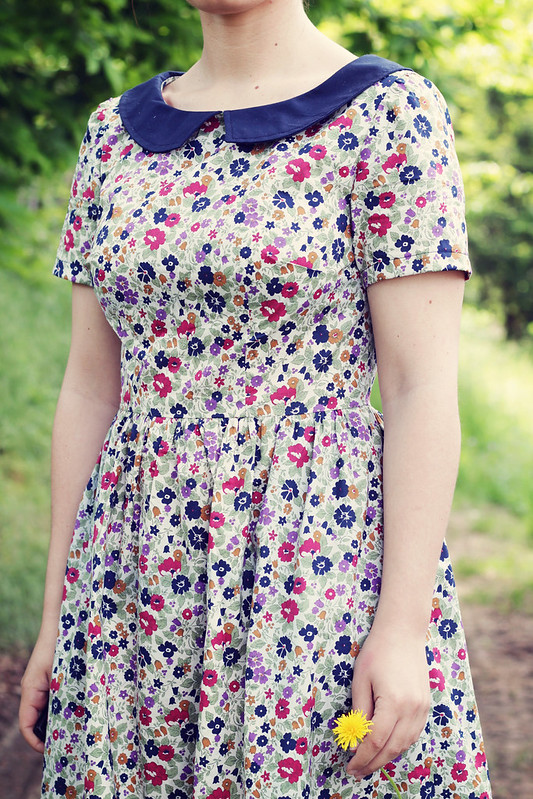
Fabric: floral cotton lawn and blue polycotton from Minerva Crafts.

As I mentioned in my last post for the Minerva Blogger Network, I wasn’t really over the moon about my last three kits. I put them together with the intention of trying new materials and going a little out of the box, but as it turns out, when you have a deadline and you can’t dedicate too much time to these projects, experimenting is not the best idea. So while putting together the following three kits, I decided to go back to basics: my favourite fabric, cotton (cotton lawn in particular) and my favourite type of garment, dresses.

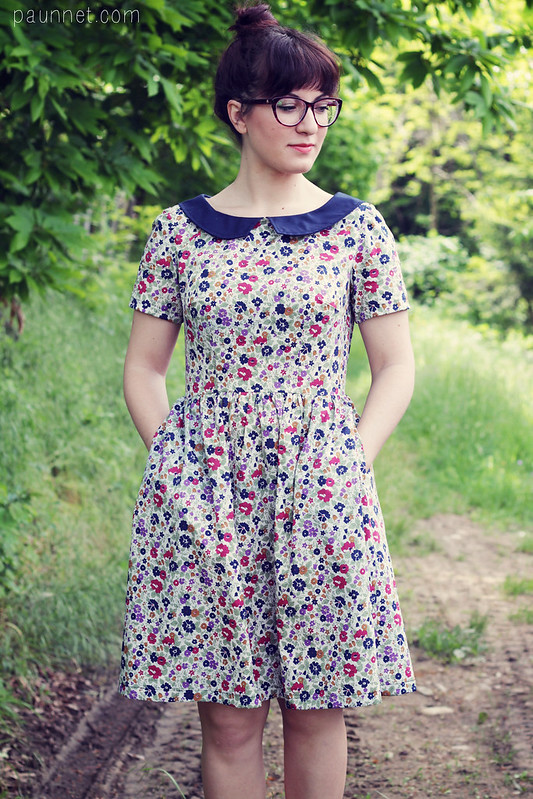
So, this month, I am presenting you a rather simple dress, but it’s one I am really happy about. I chose an extremely cute floral cotton lawn, which is perfect for Spring, and decided to add a blue contrast collar.

The pattern is used is once again the Emery dress by Christine Haynes, which you've already seen here and here. This pattern is well drafted, simple to make and has great instructions. And it has pockets, too! :D I cut my usual size 6 with a 1,5cm FBA.

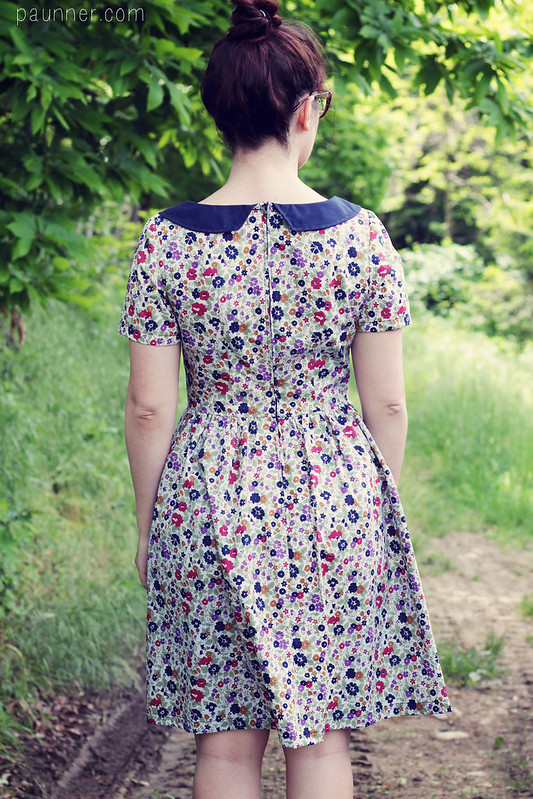
There’s not a lot to say about construction, because, as I mentioned, the instructions are pretty straightforward. I particularly like the way the collar is constructed, because it makes it so much easier to have a perfect match at the centre front. The only change I made is that I didn’t line the bodice, so I finished the neckline with self-made bias tape.

As anticipated, this dress might not be earth-shattering, but it fits perfectly in my wardrobe and I feel happy wearing it, which is a win-win.

Finally, a word on my glasses: they're new and they're courtesy of Ozeal Glasses. The pair I chose is a cat eye shape (my favorite) from designer Human Skull, the model is called Amy Red (unfortunately not available at the moment, a similar pair could be this one).
Anyway, the variety on the site is huge, the customer service was great with me, and the glasses themselves are honestly good quality, especially if you consider the price. I think this site is great if you want a spare pair of glasses or want to try a different frame without spending a lot (they also offer free shipping). Recommended! :D

Modello: abito Emery di Christine Haynes (acquistato da Urban Cut).
Taglia: 6
Modifiche: ho aggiunto 1,5cm per il petto seguendo questo fantastico tutorial e ho allungato le maniche di circa 4cm.
Tessuto: cotone floreale e misto cotone blu di Minerva Crafts.

Come avevo accennato nel mio ultimo post per il Minerva Blogger Network, non sono molto soddisfatta dei miei ultimi 3 kit. Quando li ho messi insieme, volevo provare tessuti nuovi e fare delle cose un po' diverse, ma a quanto pare, quando si ha una scadenza al mese e poco tempo da dedicarvi, sperimentare non è la scelta migliore.

Quindi, quando ho creato i successivi 3 kit, ho deciso di tornare alle origini: ho scelto la mia stoffa preferita, il cotone, e il mio capo di abbigliamento preferito, l'abito.

Perciò questo mese vi presento un abitino relativamente semplice, ma del quale sono molto felice. Ho scelto un carinissimo cotone floreale, perfetto per la primavera e ho deciso di aggiungergli un colletto a contrasto.

Il modello che ho usato è ancora una volta l'abito Emery di Christine Haynes, che vi ho già mostrato qui e qui. Si tratta di un modello ben disegnato, semplice da realizzare e che ha delle ottime istruzioni. Ho tagliato la mia solita taglia 6 con una modifica per il seno di 1,5cm.

Non c'è granchè da dire sull'assemblaggio, perchè, come accennato, è piuttosto semplice. Mi piace in particolare come viene cucito il colletto, perchè è semplicissimo farlo combaciare al centro della scollatura.
L'unico cambiamento che ho fatto è stato di non foderare il corpino, e di rifinire la scollatura con dello sbieco fatto in casa.

Come ho detto, non è un abito rivoluzionario, ma si integra perfettamente nel mio guardaroba e mi indossarlo mi rende felice, perciò è una vittoria su tutti i fronti.

Infine, due parole sui miei occhiali. Sono nuovi e mi sono stati mandati da Ozeal Glasses. Quelli che ho scelto io sono il modello Amy Red del designer Human Skull (purtroppo non disponibili al momento, ma questi sono simili).
Questo sito offre una varietà enorme di scelta, il servizio clienti è stato fantastico con me e gli occhiali sono di buona qualità, specialmente se si considera il prezzo.
Penso sia un'ottima risorsa se siete alla ricerca di un paio di occhiali di riserva o se volete provare una montatura diversa senza spendere un capitale (la spedizione è addirittura gratuita). Raccomandato! :D