Thursday, October 22, 2015

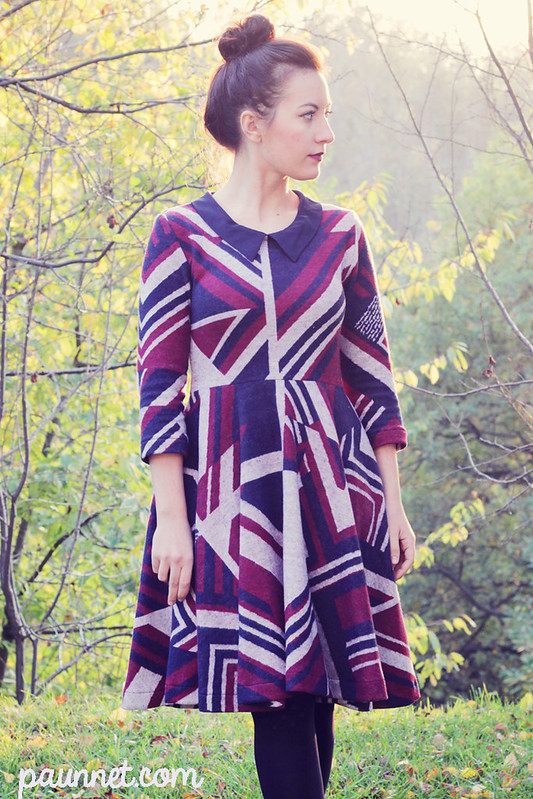
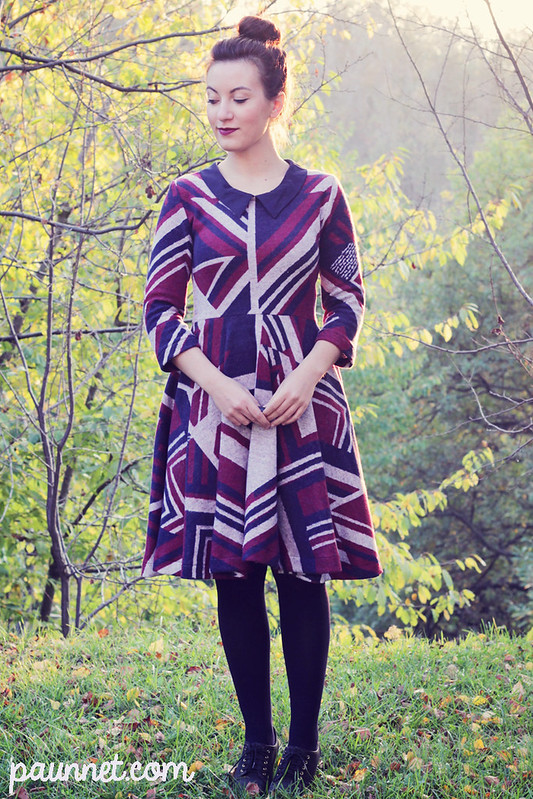
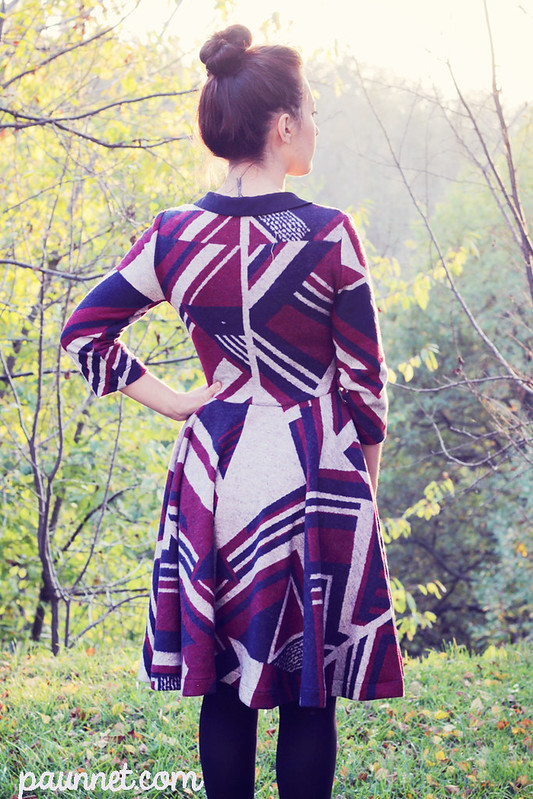
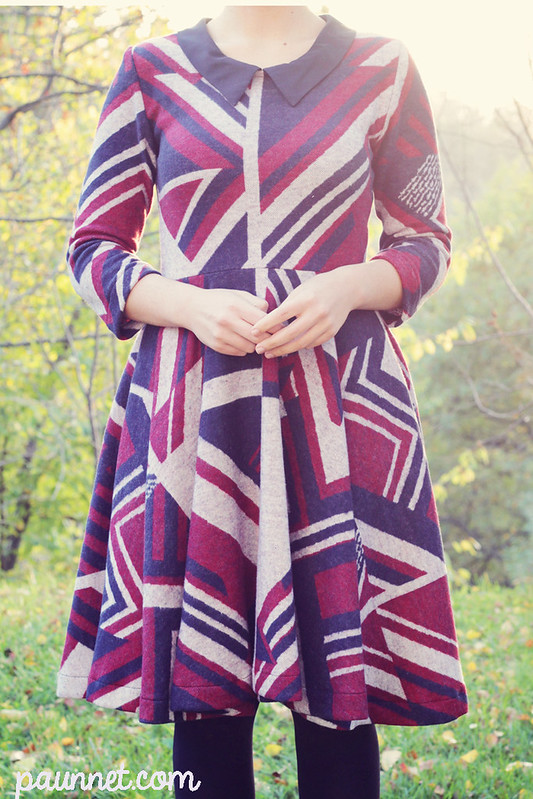
Sweet Ambassadrice - Knit dress with circle skirt and collar

[For the Italian version of this post, press the Italian flag on the right -
Per leggere questo post in italiano, premi la bandierina italiana sulla destra]


A few weeks ago, I had just left school and was distractedly scrolling through my Instagram feed on the subway, when I saw that Portugal-based French fabric and notion store, The Sweet Mercerie, was having the second edition of a mini contest called "Sweet Ambassadrice".

Basically, they presented this graphic print fabric and invited people to send their ideas on what to make with it. They would provide fabric to the three people whose idea they'd like the most.


I thought it was such a fun and stimulating idea! So, as soon as I got home, I sent a VERY raw sketch of a dress with a plain bodice, a circle skirt, and a peter pan collar (of course). I liked the contrast of the graphic print with a very feminine shape, and the heaviness of the fabric (230 gr/m²) combined with such a full skirt.

Well, as you might have guessed by now, I was chosen!

I ended up having to rush the construction of this dress, because the fabric took a while to arrive all the way from Portugal, and then I was away for a week at Abilmente (such a fun experience).

In the end, what I did was:
- using my bodice sloper, removing the darts, lowering the neckline and the armhole curve. No ease was added.
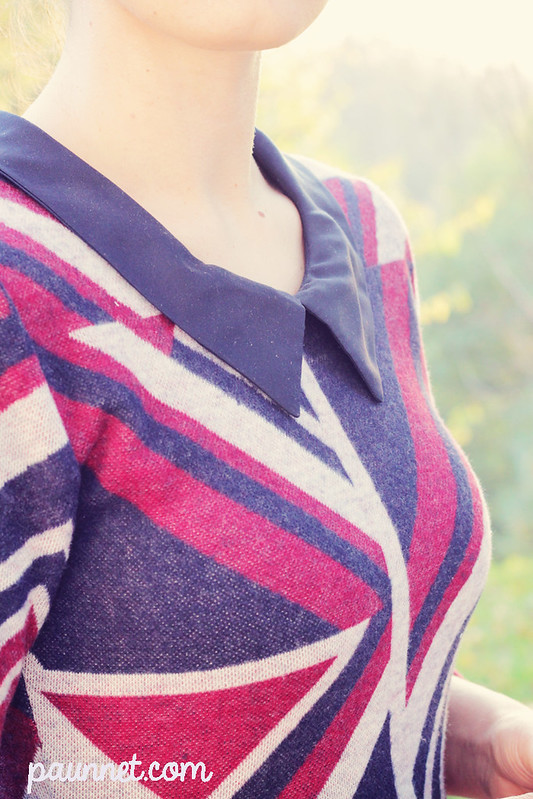
- drafting narrow 3/4 length sleeves, a circle skirt and a collar. I ended up with a Chelsea collar, as I thought a round shape would clash too much with the lines of the fabric.

That might seem like a lot work, but if you have some practice in drafting patterns, you'll know that wasn't difficult at all.
I serged everything together, making minor fit adjustments as I went along, then sewed the collar and finished the neckline with bias tape. I hemmed the sleeves and the skirt with a narrow zigzag stitch.

It was a really, really quick project, and it's not a perfect one by far. I'll probably go back and adjust the waist a little more, as well as getting some help with evening out the skirt's hem (it's a bit wonky).

I must admit I wasn't 100% in love with this dress, but the more I look at these photos, the more I like it. It feels like wearing a very feminine, fitted blanket, so it'll definitely be great for colder months.

If you like this fabric and purchase it for yourself, though, don't forget that it's very heavy. If you want to avoid the "blanket" effect (which I actually wanted), you can always switch the circle skirt with a pencil skirt, or just make a super cool sweater with it (for example using the Ondée pattern by Deer & Doe)!


  • Modello: fatto da me (dettagli sotto)
  • Modifiche: rispetto al modello originale, ho stretto un po' i fianchi e alzato la vita.
  • Tessuto: tessuto elasticizzato in poliestere con motivi grafici di The Sweet Mercerie; anche il tessuto del colletto proviene dallo stesso negozio, ma non so quale sia la composizione (credo viscosa?).
Qualche tempo fa, stavo distrattamente controllando il mio feed Instagram mentre ero sulla metropolitana, quando mi sono imbattuta in questa iniziativa del negozio di tessuti francese (basato in Portogallo), The Sweet Mercerie, chiamata "Sweet Ambassadrice": in pratica, presentato un tessuto scelto da loro, invitavano a mandare idee su cosa realizzarci. Le tre ragazze con le idee preferite da loro avrebbero ricevuto il tessuto necessario per ricreare tale capi.

"Che bella idea!" ho pensato, e stimolante, proprio in un periodo in cui ho veramente bisogno di stimoli per rimettermi a cucire per me stessa. 

Così, appena arrivata a casa, ho subito mandato uno schizzo (bruttissimo, per altro) di un abitino con corpino semplice, gonna a ruota, e colletto Claudine (ovviamente).
Mi piaceva molto il contrasto tra la stampa grafica e una silhouette estremamente femminile, così come l'associare il peso alto del tessuto (230 gr/m) ad una gonna così ampia.

E beh, se siete molto, molto perspicaci avrete capito che sono stata scelta! :)

La costruzione di quest'abito è stata estremamente frettolosa, purtroppo, poichè il tessuto ci ha messo un bel po' ad arrivare dal Portogallo e perchè la settimana scorsa sono stata a Vicenza per Abilmente (che esperienza stupenda!!!).

Per riassumere, ecco com'è nato quest'abito:
- Per il modello, ho usato la mia base del corpino, ho eliminato le pince e abbassato scollo e giromanica.
- Ho disegnato delle maniche aderenti a 3/4, una gonna a ruota e un colletto con un pochino di montante. Invece del collo Claudine (o Peter Pan) ho scelto un colletto a punta, avevo paura che la forma arrotondata stonasse con le righe dritte del tessuto.
Può sembrare un lavoro lungo, ma con un po' di esperienza sulle spalle di modellistica, si tratta di un processo estremamente semplice.
- Ho poi cucito tutto a tagliacuci, facendo prove ed aggiustamenti intermedi. Ho cucito il colletto, l'ho attaccato allo scollo e ho rifinito con dello sbieco. Ho fatto l'orlo a maniche e gonna con uno zigzag molto stretto.

E' stato un progetto superveloce, e anche per questo, non proprio perfetto. Voglio stringere ulteriormente la vita e farmi dare una mano per livellare l'orlo, che in questo momento è un po' stortino, anche se in queste foto lo sembra più di quello che non sia davvero, poichè non mi sono sistemata bene l'abito addosso (infatti anche la linea della vita sembra stortissima).

Una volta finito, non è che ne fossi proprio innamorata, ma più guardo queste foto e più mi piace. Sembra di indossare una coperta super femminile e aderente; sicuramente nei mesi più freddi sarà un alleato niente male, per me che odio infagottarmi anche con -5° fuori.

Se vi piace questo tessuto e intendete acquistarlo per voi, non scordate che è davvero molto pesante. Se volete evitare l'effetto "coperta" (che io ho invece voluto), scegliete una gonna meno ampia (o addirittura una gonna a tubino), oppure fermatevi al busto e fate un bel maglioncino (ad esempio usando il modello Ondée di Deer&Doe)! 

Thursday, October 8, 2015

Sewing Meetup @ Abilmente Craft Fair, Vicenza - 17/10/2015


Ah! How perfectly me to write a post about going back to blog regularly, and then disappear for three months!
Sorry if I created any expectations, guys. My intentions were good, but my time management and motivation are still in the dump.

Anyway, I have a great announcement today! I already posted this on Instagram and on my Facebook page, but it's high time I mention it here.
We're having a second meetup next week, at Abilmente Craft Fair in Vicenza!

The event includes a brunch and a pattern swap (everyone brings a pattern, wrapped in gift paper and we randomly exchange them).
Notable participants will be pattern designers of the brand Named, Liesl Gibson of Oliver & S, Liesl + Co and Lisette, fellow Italian designer Nicoletta of Di Nuvole Di Cuori and bloggers Silvia of Sewing Princess and Sasha of Fruits, Flowers & Clouds.

If you want to join the fun, you can register online here. For more info, check out our Facebook page or send us an email.

See you there? :)


Un applauso a me, che dopo aver scritto un post in cui annunciavo di essere tornata sul blog, sono sparita per tre mesi...
Chiedo scusa se ho creato delle aspettative in qualcuno, purtroppo il mio time management e il mio livello di motivazione sono ancora ai minimi storici.

Ma voltiamo pagina, e passiamo a un annuncio positivo:
L'avevo accennato su Instagram e sulla mia pagina Facebook, ma è ora di parlarle anche qui: ci sarà un secondo incontro ad Abilmente, a Vicenza!

L'incontro prevede un brunch e uno scambio di cartamodelli (ognuna ne porta uno avvolto in carta da regalo). Sarà l'occasione per incontrare le designer del marchio Named, Liesl Gibson di Oliver & S, Liesl + Co e Lisette, la nuova promessa Nicoletta of Di Nuvole Di Cuori e le splendide blogger Silvia di Sewing Princess e Sasha of Fruits, Flowers & Clouds. Oltre che, ovviamente, di fare un bel giro nella più grande fiera di arte creative in Italia!

Se volete unirvi a noi, potete iscrivervi qui. Per maggiori informazioni, ci trovate sulla nostra pagina Facebook o potete mandarci una mail.

Ci vediamo lì? :)

Wednesday, July 8, 2015

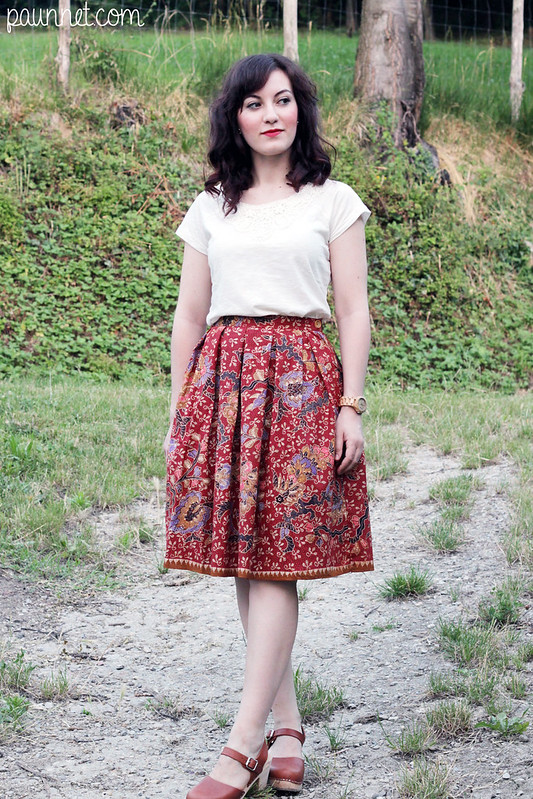
I'm back! With a red skirt...

Pattern: self drafted (not much drafting involved, though...)
Fabric: vintage sarong-type cotton gifted to me years ago

Hullooooooo! Guess who's still alive?
Joking aside, I'm finally back with a post on my beloved, yet neglected blog, and I hope to be able to get back to posting at a more regular pace. Maybe not twice a week, but not disappearing for months on end either...

So, where have I been all this time?
Nowhere, really, it's just that real life has been extremely busy since... well, since last year. I just didn't have enough time, energy and motivation to spend on the blog.

The thing is, I started a professional pattern drafting class in February last year; I have to commute to attend, and I've been working two jobs to be able to afford it, AND my boyfriend and I have started remodeling his late grandma's house to eventually move in it together, so I've been pretty burn out in real life to entertain my virtual one.


I'll tell you more about my classes in future posts (especially because I definitely want to document my school work), but for the moment, I just want to say IT'S AMAZING.
At 27 (now 28), it wasn't easy to decide to go back to being a student, meaning not being able to work full time and a whole other series of sacrifices, but I feel like a new person. I'm finally doing something I truly love and makes me feel fulfilled, and I feel like I'm on the right track. 

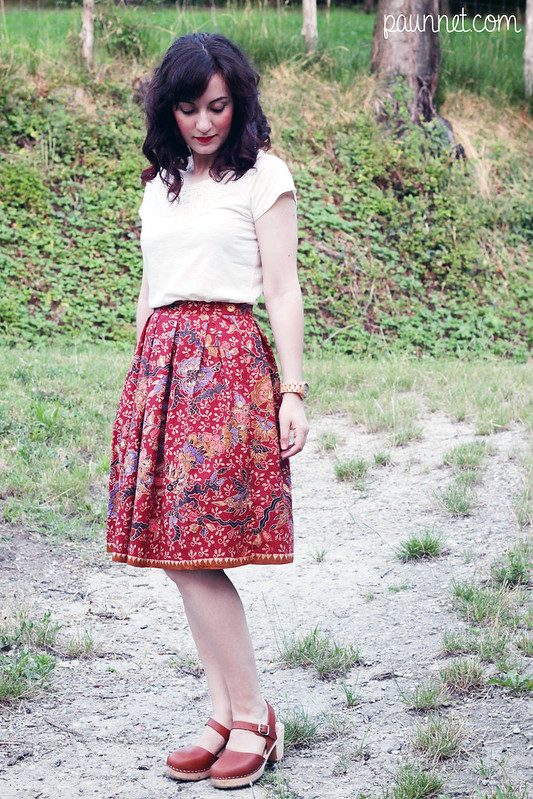
Clogs: Lotta from Stockholm
Anyways, why back now?
Things have not really changed that much, although I quit one of my two jobs and I'm about to start my summer break from class, so I will have a little extra free time for the moment. And I missed the blog and you guys too much to go on keeping to myself :D

Enter: the two-hour-skirt. Last Sunday I had the urge to make something quick and rewarding, so I grabbed one of the vintage fabrics my father-in-law gifted me (you can also see them in action here and here) and decided to make a skirt.

When making a pleated skirt, you can either:
- use you skirt sloper, slash it and add the pleats;
- or you want to use some math (waist measurement/2 + seam allowance + [measurement of single pleat] * number of pleats).

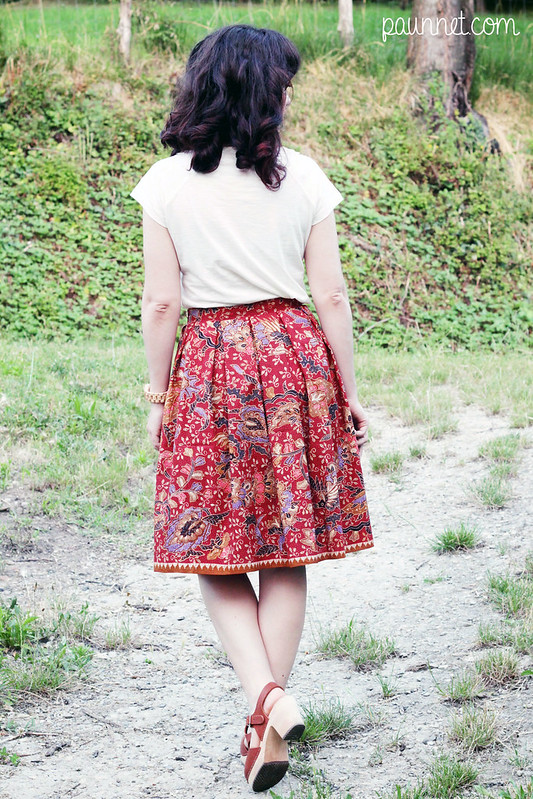
Honestly, I didn't do either. I cut two panels in the width of the fabric (in my case, 110cm), long as much as I wanted the skirt to be (56cm+1cm for waist seam allowance; I didn't need hem allowance because of the border print).
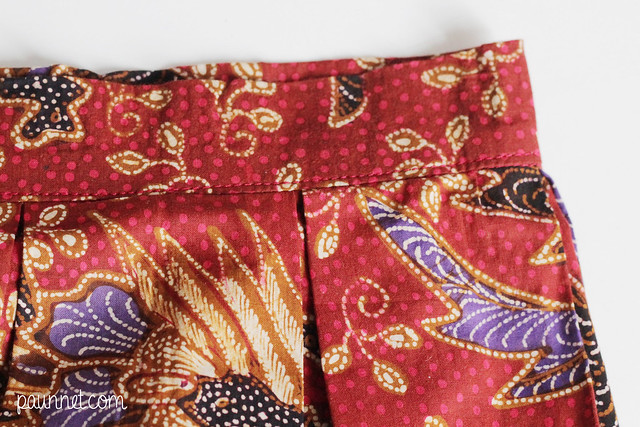
I then proceeded to pleat the fabric starting from the center; I made box pleats with a depth of 6cm + 6cm each. After pleating the whole panel, I measured it, and cut away the excess from the side.
It can be a wasteful method (although I had to cut less than 5cm from each side because my fabric was so narrow to start with), but it's definitely a fast one. 
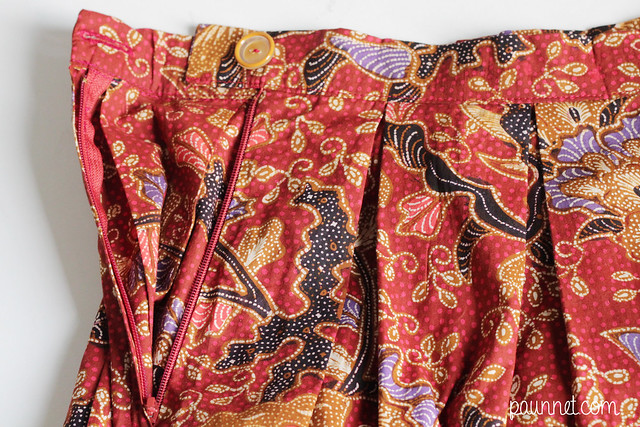
I sewed the side seams, added a zipper on the left side, added a straight waistband and a button... and voila, done!
I didn't even need to hem it!

I love the deep red of this fabric, and its luscious print; I'm really happy with the final result! As a personal preference, I tend to gravitate toward complicated designs with many details, but I'm learning that keeping it simple can often be the best things :)


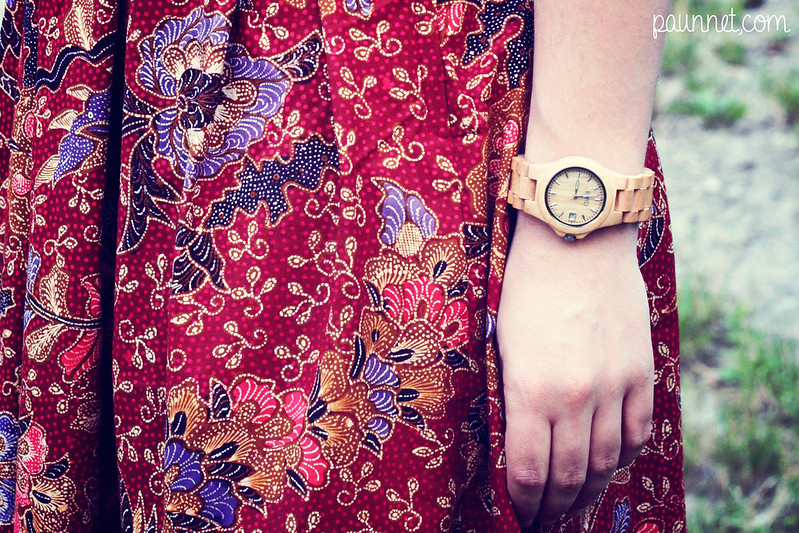
One last thing... Do you like my watch? Because I'm pretty much in love with it.
It's by Jord and yes, it's made of wood (maple, actually). I don't think I've ever received so many compliments for an accessory! My mum has even already picked one as a gift for her next birthday.
The company sent it to me, and I usually refuse any "free-merchandise-in-exchange-for-a-feature" kind of deals, but this just proves how much I liked their products, and I'm honestly glad I accepted. Furthermore, the guys at Jord offered one watch to giveaway to my readers, so if you do like it, stay tuned, because a giveaway is coming soon :)

Modello: fatto da me (anche se non si può parlare propriamente di modello...)
Tessuto: cotone vintage tipo batik, regalatomi anni fa.

Ciaoooo! Indovinate chi è ancora viva?
Non posso credere di essere finalmente tornata a scrivere un post sul mio tanto amato quanto trascurato blog... Evviva! E torno anche con le migliori intenzioni di rimettermi a postare regolarmente, magari non due volte a settimana, ma cercando almeno di non sparire di nuovo per mesi e mesi.

E quindi, dov'ero finita?
Da nessuna parte, in realtà, è solo che sono stata incredibilmente impegnata nella "vita reale" da... beh, praticamente dall'anno scorso. Semplicemente non avevo abbastanza tempo, energie e motivazione da investire nel blog.

Il fatto è che ho iniziato un corso professionale da modellista a febbraio dell'anno scorso, che è lontano da casa e quindi mi richiede di viaggiare. Ho iniziato a fare due lavori part time per permettermi tale corso e in più, con il mio ragazzo, abbiamo iniziato a ristrutturare casa per andarci a vivere insieme in un futuro (speriamo) prossimo. In sostanza ero troppo esaurita nella vita reale per mandarne avanti una virtuale. 
Vi dirò di più del mio corso in futuro (anche perchè voglio documentare quello che sto facendo a scuola), ma per il momento vi basti sapere che è FICHISSIMO.
A 27 anni (ora 28), non è stato semplice decidere di tornare a studiare, e di conseguenza non poter avere un lavoro a tempo pieno e tutta un'altra serie di sacrifici, ma mi sento veramente una persona nuova. Finalmente sto facendo una cosa che amo, e sento di aver intrapreso un percorso giusto per il mio futuro. 

Zoccoli: Lotta from Stockholm
Ma alla fine, perché sono tornata proprio adesso?
A dire il vero, la mia situazione personale non è cambiata poi così tanto rispetto a ciò che ho appena descritto, anche se ho lasciato uno dei miei due lavori e sto per iniziare la pausa estiva scolastica, il che significa maggior tempo libero, per ora. E sinceramente, mi mancava troppo il blog per continuare a lasciarlo in questo desolante silenzio. 

E quindi entra in scena: la gonna fatta in due ore. Domenica scorsa avevo il bisogno fisico di produrre qualcosa in maniera veloce e soddisfacente, perciò ho preso uno dei meravigliosi tessuti vintage che mi aveva regalato mio suocero (li potete vedere in azione qui e qui) e ci ho fatto una gonna.

Per fare una gonna a pieghe, potete:
- usare la vostra base della gonna (se ne avete una), fare dei tagli verticali e inserire le pieghe;
- oppure usare una semplice formula matematica (misura della vita/2 + margini di cucitura + [misura di una piega] x numero delle pieghe) per ottenere uno dei due pannelli che vi serviranno.

Io, sinceramente, non ho fatto nessuna delle due cose. Ho tagliato due lunghezze del mio tessuto nella misura della lunghezza della gonna (56cm+1cm per il margine di cucitura del cinturino; non mi serviva calcolare l'orlo poichè intendevo utilizzare la stampa sul bordo del tessuto).
Ho poi piegato il tessuto partendo dal centro, formando delle pieghe baciate di 6cm di profondità. Dopo aver piegato un pannello, ho misurato metà della mia vita e ho tagliato l'eccesso. E' un metodo che può risultare in un certo spreco di tessuto; nel mio caso, il tessuto era largo solo 110cm e quindi ho rimosso meno di 5cm da ogni fianco.
A questo punto ho cucito i fianchi, aggiunto una zip, cucito un cinturino dritto e un bottone... e voilà, finito! Senza nemmeno dover fare l'orlo!

Adoro il rosso intenso di questo tessuto, e la fantasia lussureggiante. Si capisce che sono molto soddisfatta del risultato?
A volte tendo ad essere attratta da design complicati con molti dettagli, ma sto imparando che invece, spesso, mantenere le cose semplici può essere la cosa migliore :)

E infine, per concludere questo lungo post... Vi piace il mio orologio? Io lo adoro.
E' del marchio Jord e sì, è di legno (acero, in effetti)! Non credo di aver mai ricevuto così tanti complimenti per un accessorio. Mia madre me l'ha addirittura chiesto come regalo per il suo prossimo compleanno.
Mi è stato mandato dall'azienda, e io di solito rifiuto a priori l'invio di merce in cambio di un post "pubblicitario", il che sta a riprova di quanto mi piacesse questo orologio. Devo dire che sono assolutamente contenta di non aver rifiutato!
Inoltre, Jord ha gentilmente concesso un orologio in regalo ai lettori del mio blog, perciò se vi piacciono questi gioiellini in legno restate sintonizzati, perchè ci sarà presto un giveaway :D

Tuesday, February 24, 2015

First Italian Sewing Meetup - Primo Incontro Cucito Italiano - Milano, 28/3/15


Hey, guys!
I have a great announcement for you today!
Silvia, Marine, Nicoletta and myself (the team behind the Facebook page Blog italiani di Cucito) have been organizing the first ever Italian Sewing Meetup!The idea has been tossed around for a while now, so I’m really happy that it’s finally happening!

Here is the detailed program:

Meet up around 11am for brunch at Lab Café in Milan, via L. Scrosati 9. Brunch is 10 Euros.

The menu includes:
  • a savoury croissant or sandwich
  • a small quiche
  • yoghurt with fruit and cereal or toast with jam
  • orange juice
  • coffee
You can pay directly at Lab Café on the day.

While at Lab Café we will have a fabric swap. Simply wrap up some fabric from your stash (Don’t panic! You’ll have a chance to get more fabric after brunch).
We will put all names in a jar, then we will pick them out one at the time…and you’ll be able to choose the package you like the best… and go home with some brand new fabric for your next project.

At 2:30 pm we will leave Lab Café and head to one or two fabric stores… it will be great fun to shop or to just look at fabric all together! We will reveal the store names in the coming days.

We will wrap up the day around 5 p.m. or whenever you need to leave!

How to get there:

  • From Central railway station, take the underground Green Line and get off at Cadorna stop. Once in Cadorna, you will need to transfer and take the Red Line in Direction Bisceglie and get off to Bande Nere stop. Careful: Pay attention to the Red Line direction. There are two options: one goes to Rho Fiera (wrong direction) the other to Bisceglie (right direction). From there you can walk 10-15 minutes or take bus 95, get off at Via Soderini/Via D’Alviano and walk 500 meters (itinerary)

  • From Cadorna railway station, take bus 58, get off at Via Soderini/Via D’Alviano and walk 500 meters. (itinerary). From there you can walk 10-15 minutes or take bus 95, get off at Via Soderini/Via D’Alviano and walk 500 meters (itinerary)

  • From Garibaldi railway station, take the underground to Cadorna stop (Green Line) and then transfer to Red Line and get off at Bande Nere.From there you can walk 10-15 minutes or take bus 95, get off at Via Soderini/Via D’Alviano and walk 500 meters (itinerary)

  • Here is Lab Café (both management and name have changed in the meantime) 


Questions?

Feel free to contact us at cucitoitaliano@gmail.com or write on our Facebook page Blog Italiani di Cucito.

Are you convinced yet?
Please register by March 13th by filling in the online form. Hurry, we have limited space (30 people) available! 


Ragazze, scrivo questo post emozionata come una bambina, con un grande annuncio: con Silvia, Marine e Nicoletta stiamo organizzando il primo Incontro di Cucito Italiano.
L'idea era nell'aria da un po' di tempo e sono felicissima che finalmente si stia realizzando.

Ecco il programma nel dettaglio:

Ritrovo dalle 11 in avanti presso il Lab Café a Milano in via L. Scrosati 9 per un brunch a 10 euro.

Il menu brunch consiste in:

  • una brioche salata farcita o un sandwich
  • una mini quiche
  • yogurt con cereali e frutta o pane tostato con marmellata
  • succo d’arancia
  • caffè

Potrete pagare direttamente al Lab Café il giorno stesso.

Non dimenticate di indicare eventuali intolleranze alimentari nel form di iscrizione (link sotto)!

Mentre saremo al Lab Cafe, ci sarà lo scambio stoffe (fabric swap).
In cosa consiste?
Ognuna di noi porterà un taglio di stoffa proveniente dalla propria collezione (no, non fate quella faccia, potrete rifarvi dopo il brunch!) e la incarterà.
Mentre faremo il brunch, estrarremo i nomi delle partecipanti da un’urna e, a caso, sceglieremo il pacchetto che ci piace di più. Così ognuna di noi avrà una nuova fiammante stoffa da poter usare nei suoi prossimi progetti!

Verso le 14:30 ci sposteremo in uno o due negozi di stoffe: quando riavremo l’opportunità di vedere e/o acquistare stoffe tutte insieme? I nomi dei negozi verranno confermati nei prossimi giorni.

Chiuderemo la giornata verso le 17 o quando vorrete/dovrete tornare a casa!

Come arrivare?

  • Dalla stazione Centrale, potete prendere la metropolitana Linea Verde fino a Cadorna. A Cadorna cambiare e prendere la Linea Rossa in Direzione Bisceglie fino alla fermata Bande Nere. Attenzione: Prestate attenzione alla direzione della Linea Rossa, una linea va a Rho Fiera (sbagliata) e una Bisceglie (corretta). Da lì potete arrivare a piedi (10-15 minuti) o prendere l´autobus 95 scendendo a Via Soderini/Via D’Alviano e camminare 500 metri (percorso).

  • Dalla stazione Cadorna potete prendere l’autobus 58, scendendo aVia Soderini/Via D’Alviano. Il Lab Café dista 500 metri a piedi (percorso)

  • Dalla stazione Garibaldi potete prendere la metropolitana Linea Verde fino a Cadorna e lì cambiare sulla Linea Rossa fino alla fermata Bande Nere. Da lì potete arrivare a piedi (10-15 minuti) o prendere l´autobus 95 scendendo a Via Soderini/Via D’Alviano e camminare 500 metri (percorso)

  • Questo è il Lab Café (nel frattempo ha cambiato nome e gestione!) 


Che ne dite, siete dei nostri?
Non vediamo l’ora di incontrarvi! Ma non dimenticate di iscrivervi entro il 13/03 compilando questo form… i posti sono limitati (c'è posto per 30 persone)!

Sunday, January 25, 2015

La Mia Boutique 01-02/2015

This morning I woke up feeling like giving some unrequested opinions on something, so I figured there was no better time to write a review :)

The good people of La Mia Boutique sent me a PDF of the new issue, which was not only very kind on their part (saves me A LOT of time in scanning the magazine), but it also shows they're not afraid of criticism, which impressed me quite a bit (they actually told me they do read my reviews and try to take notes, wow).

That being said, I'm afraid it doesn't make me less of a bitch harsh critic.

First of all, it's almost Carnival in our little corner of the world, which means dressing up in costumes, especially for children.
I know I usually skip the children patterns altogether, but I find costumes' patterns especially useful to have around (they're highly requested by relatives and friends, in my experience, and can be rather complicated to draft on your own) so I wanted to show them.
Furthermore, I've been working in a children store in the last three months, so I'm becoming less and less allergic to kids related stuff by the day.

This first strawberry costume looks really adorable, and quite easy to make as well.

I found this incredibly cute in its semplicity. I'd personally replace the floppy headpiece with a simpler headband with ears.

Mmph. Good idea, not liking the execution. It needs some major embellishing and accessorizing to work as costume, because it's a little sad as is.

I wouldn't have used an out of focus photo on a national magazine just because it's a jump shot (come on!), but ok.
I find this costume hilariously bad and outdated, but maybe it's just me.

Again, so sad!
If you go for American Indian, a feather headpiece is a must.

Awww, such a classic! But also, very cold! This needs a lot of layers if you want to avoid your kid going into hypothermia, so what's the point?

A Burberry print doesn't exactly scream cowboy in my opinion, but ok... Again, this needs more accessories and props to work, like, I don't know, a cowboy hat?! Presentation is everything, people!

This one is definitely my favorite although I seriously don't get the braids attached to the hood of the cape. When the hood is not on, they look really weird.

But wait, there's more! Costumes for adults!
This one, I find quite sad, and definitely not appropriate for a Morticia look... Maybe a vampire?

This one is quite beautiful, and it also includes a pattern for the headpiece.

The shiny poly fabric is a turnoff, but it's an otherwise very cute costume.

Ok now, real life clothes!
After the plethora of costumes, I decided to only includes pattern I more of less like. So, of course I included a coat. I don't like the styling here (popped up collars give me physical pain), but everything else works for me.

Two basic patterns, but quite cute ones. They also work quite nicely together.

Again, basic, but cute. Looks like instant gratification. Not much more to say...

Ooooh! Love this cape with the contrast bands! Love, love, love.

Aand, finally, a pretty cute outfit. I would gladly wear every piece here, although I'll use them more as an inspiration rather than using every single pattern here.

If you want to take a look at the rest of the patterns included in this double issue, here they are:


Aand... My job is done, I'm out! :)

Saturday, January 10, 2015

Louisa dress pattern by Compagnie M.

Hello, everyone! Guess who's still alive? :)

I'm emerging from my loooong silence today to introduce to you a wonderful pattern for little girls, the Louisa dress by Compagnie M.

As per its description, the Louisa dress is "a vintage inspired pattern with a modern twist. Unique pockets and three back options make this a versatile pattern. Add lining according to the season and enjoy this pattern the whole year round."
The pattern includes sizes: from 1y to 10y.

Source
Compagnie M. and I teamed up to translate this pattern, (understandably) their best seller, into Italian (the Louisa dress is also available in English, French, German and Dutch).
I really want to help spreading the love for indie patterns in my country, so I feel it's almost my duty to give my contribution as a trained translator.
And this week the Louisa dress pattern is touring around some amazing Italian blogs to celebrate its new language!

I was supposed to present to you my version today, but as I'm a very bad, disorganized blogger (as you might have noticed in the last few months), I didn't manage to finish the dress I was making for my niece Caterina in time, so that will have to wait. In the meantime, enjoy the wonderful creations by the other Italian bloggers included in the tour so far:

Dotta Sews - My Cute Sewing
 Mademoiselle Chou Chou - Mamma Craft
Mamma 190
So good, right?
Although I have nothing to show, I can't recommend this pattern enough. The design is just adorable (with that vintage touch I just can't resist), the instructions are extremely detailed (meaning: beginner friendly) and once you print this huge pdf (only downside I could find), this project is guaranteed immediate gratification.

If you want to celebrate with us, you can purchase the Louisa dress pattern with a 10% discount until tomorrow using the code LOUISA-INTRO.
(And if, like me, you're not too much into kids patterns, just know that Compagnie M. just started releasing women's patterns, like the Lotta skirt pattern... just sayin').

Cucù! Indovinate chi è ancora viva?

Oggi riemergo dal mio luuuungo silenzio per parlarvi di un meraviglioso modello da bambina, l'abito Louisa di Compagnie M. 

Quest'abito viene descritto come un modello d'ispirazione vintage con un tocco moderno. La forma unica della tasca e tre opzioni per il dietro lo rendono un modello molto versatile. A seconda della stagione, si può aggiungere una fodera e utilizzarlo tutto l'anno.
Le taglie incluse nel modello vanno da 1 a 10 anni. 

Source
Compagnie M. ed io abbiamo collaborato per tradurre questo modello in italiano (che, non a caso, è il loro best seller). L'abito Louisa è disponibile anche in inglese, francese, tedesco e olandese.
Diffondere l'amore per il cucito e per i modelli indie nel nostro Paese è una causa che mi sta davvero a cuore, perciò dare un contributo in quanto traduttrice mi è sembrato davvero di dovere.
E per festeggiare il fatto che adesso Louisa parla italiano, questa settimana il modello sta facendo un bel tour in alcuni dei più bei blog del nostro Paese.

Oggi vi avrei dovuto far vedere la mia versione, cucita per la mia nipotina Caterina, ma essendo una blogger cattiva e disorganizzata (come forse avrete notato negli ultimi mesi), non sono riuscita a finirla in tempo. Nel frattempo, vi lascio riempire gli occhi con le creazioni delle altre bravissime blogger incluse nel tour finora:

Dotta Sews My Cute Sewing
 Mademoiselle Chou Chou - Mamma Craft
Mamma 190
Bellissime, no?
Nonostante non abbia nulla da mostrare, non posso che raccomandarvi questo modello con tutto il cuore. Il design parla da sé ed è decisamente adorabile, con quel tocco vintage a cui io proprio non so resistere, le istruzioni sono estremamente dettagliate (e quindi a prova di principianti) e una volta stampato l'enorme pdf del modello (unica pecca di Louisa, a mio parere), si tratta di un progetto veloce e gratificante.

Se volete partecipare ai festeggiamenti con noi, potete acquistare il modello dell'abito Louisa con uno sconto del 10% fino a domani usando il codice LOUISA-INTRO.
(E se, come me, non siete estremamente interessate ai modelli per bambini, sappiate che Compagnie M. ha appena iniziato a vendere anche modelli da donna, come ad esempio la gonna Lotta...)