


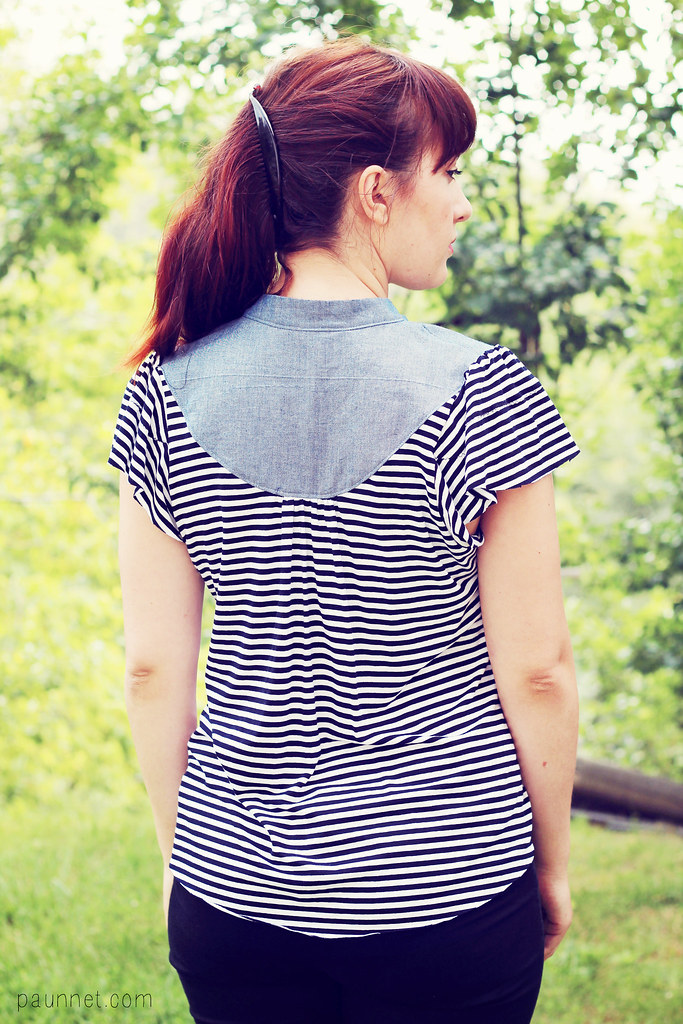
Size: size 8/10 from top to bottom
Alterations: None! Although next time, I'll raise the armhole by about 1,5cm.
Fabric: locally purchased striped jersey and chambray leftover from my Bleuet dress.

What I liked: I've had this pattern for almost 2 years (!!!) but I was always very intimidated by it, because of my irrational fear of knits (which I'm slowly conquering). I also never seemed to find some decent jersey in my fabric shopping adventures, but when I saw this striped one I knew it was perfect for this project.
I couldn't be happier with the color and texture combo of this t-shirt: chambray + black and white fit seamlessly in my wardrobe.
I couldn't be happier with the color and texture combo of this t-shirt: chambray + black and white fit seamlessly in my wardrobe.
The fit was very good on me, especially considering this is straight out the envelope (I didn't make a muslin). I love how drapey and effortless it looks: the gathered sleeves and the gathers at the center front and back create a beautiful effect.
Another big plus of this project is that it requires very little fabric, so it's a great scrap-buster. Because the t-shirt is so blousey, I think you could also get away with using a woven fabric for the main bodice, as long as it's very lightweight and drapey (for example, a voile).

What I did not like: Now, the not-so-great part... The construction of this t-shirt was a pain in the butt, to put it mildly. I thought it was a one-afternoon project, and it turned out to be more of a two-days-with-lots-of-swearing one.
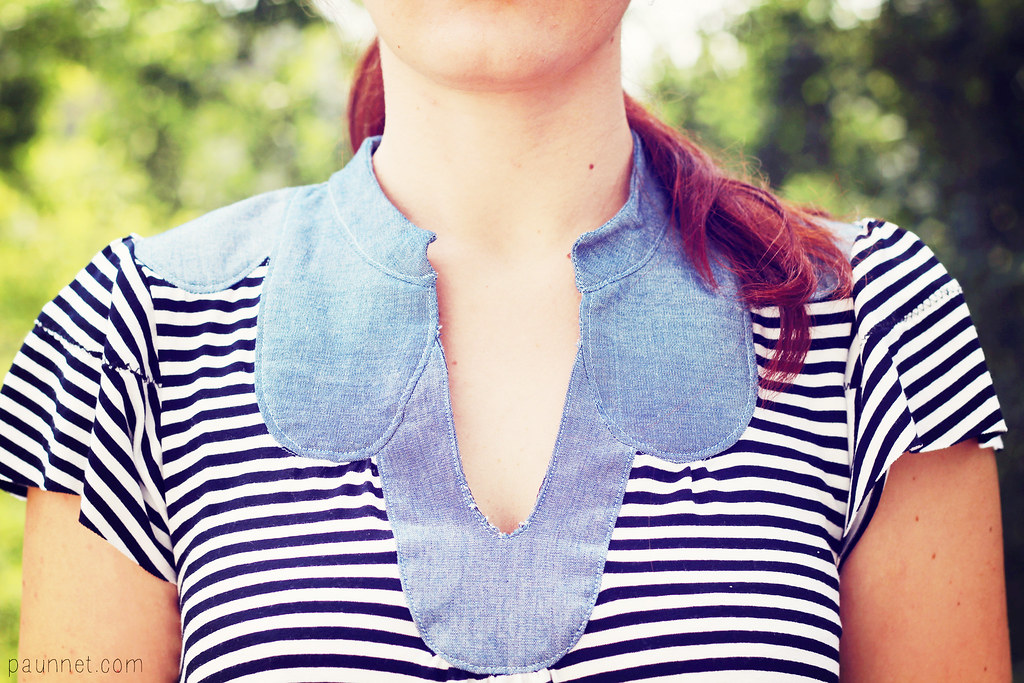
All those nice yoke pieces were the death of me. They have a 1/4" seam allowance and the instructions have you cut a cardboard template without the seam allowance so that you can press the fabric over them (does that make sense? I hope so). This process alone took FOREVER, so next time I'm going to thread mark the seam allowances, clip them and sew them without pressing them. I think this will speed things up by a lot and it will avoid accidents when clipping the seam allowance (see the curve at the center of neckline, looking like crap).
Another thing I hated with all my heart were the sleeves. You have two sleeve pieces that you are supposed to join using steam-a-seam tape on the edge and then topstitch. WHY? Why breaking up the beautiful drape of these sleeves? I didn't take the time to read the instructions carefully before cutting and after sewing my messy sleeves I just wanted to get it over with this t-shirt, so I didn't recut them. Next time, I'll definitely redraft them as one piece.
The armhole is also quite low (you can spy a bit of my bra from the side), so I'm going to raise it by 1,5cm for my next version.
Finally, I should also mention that the pattern sheets are kinda crappy. They're made of flimsy paper and there are almost no markings to help you find and follow the lines corresponding to your size. All the lines are plain and there are no little numbers at the corners to help you out, so the tracing process can be quite frustrating.
All in all, construction and pattern sheets aside, I'm in love with this t-shirt. I've been wearing it with the black capris you see in this photo or with jeans. I have yet to try it with a high-waisted skirt, but I don't think it would be the best look for it.
I definitely plan to make more with a few improvements, as soon as I find some more cute jersey.
This shirt is sooo chuffing cool. Congratulations
ReplyDeleteGreat shirt! (even with those minor quibbles) I've been eyeing this pattern for a while too, so thanks for the heads up on the weird sleeve thing!
ReplyDeleteVery attractive blouse !!!! I like very much yokes in Jeans.
ReplyDeleteI go to see the site, by hoping to find my size, thank you for the link.
This sounds like it was a headache to make, but the result is definitely pretty! The neck yoke is sooo pretty and looks really unique. I'm also really confused by the sleeve piecing. I think after your adjustments, though, this could be a really great top to make a few of!
ReplyDeleteVery funky top! I've not seen this pattern before.
ReplyDeleteThis is SO cute, and really suits you!
ReplyDeleteIt's a shame that it was such a pain to put together, but I love it when the hard work pays off and you can just forget about the hassle of making it, and just enjoy wearing an awesome top!
This looks so lovely on you! I really love the style of many of Meg McElwee's patterns but I have had frustrations with the instructions and construction techniques on occasion, too. Her 'Growing Up Sew Liberated' book has great instructions though. Perhaps the benefit of an editor? I wonder whether she uses pattern testers which might iron out some of these wrinkles before publishing? The designs are worthy of it.
ReplyDeleteThis looks so cute! I'm glad you are getting more comfortable with knits, they still scare me a lot.
ReplyDeleteThe sleeve construction does seem a bit bizarre.
Very cute - I love your fabric combination!
ReplyDeleteI've been intrigued by this pattern before, because it seems like the perfect canvas to use just a bit of those darling quilting cottons on. I can't tell by your review if I'm going to go for it or not, yet. I love your version.
ReplyDeleteCute shirt, I don't really love the look on the front neck but the whole look is lovely. :) thanks for your sincere opinion on the pattern as always! Xoxo, Giusy
ReplyDeleteLovely shirt, U really like the view from the back. The whole sewing process sounds frustrating, cardboard cutting, wow! I hope the next one will go smoother!
ReplyDeleteThe first thing I thought when I saw the top was "I bet that neckline was tricky". Not because I thought it didn't look good. I'm looking at it on my smartphone and it looks perfect!
ReplyDeleteDespite all your problems with it, it looks fabulous and it really suits you. I'm so glad you do like it after putting in all that effort. However even though the finished result is so cool I think I will avoid it!
You did a great job on this shirt! Looks fantastic. But those 2-piece sleeves are weird. Why would cutting them up and joining them again be a good idea?! very bizarre...
ReplyDeleteIt's very cute, even though it sounded like a bit of a bugger to make. I really like the little gathers at centre back.
ReplyDeleteLooks gorgeous! I hate these projects that seem to be very easy and quick at first and then you end up spending three days on it...!
ReplyDeleteI like your version, but I have to say I'm a bit put off by your pattern review. I don't get why you have to cut the sleeves into two seperate pieces (it's also not on the patternsketch...?).
ReplyDeleteI've had some experience with pressing circular patch pockets over a card board template. I always sew a basting thread (or two) within the seam allowance, then pull it tighter while carefulle folding it over the cardboard, and pressing it. This really does the trick for me!
This pattern sounds liek a bit of a jerk to construct but the end result is fantastic- the chambray and stripes combo is all kinds of awesome!
ReplyDeleteI think your review of the pattern goes for all there patterns. I bought the simple skinny jeans and they have you first press the seems and then topstitch them, they don't sew a single seam before pressing. There was an instructional video, which you could only watch with the code that came with the pattern. All in all, very confusing pattern. But I did like the end result and I do like yours :)
ReplyDelete